I've installed 1 kilowatt of solar panels on my roof, using professional
grade eqipment. The four panels are Astronergy 260 watt panels, and they're
mounted on IronRidge XR100 rails. Did it all myself, without help.
I had three goals for this install:
Cheap but sturdy. Total cost will be under $2500. It would probably cost
at least twice as much to get a professional install, and the pros might
not even want to do such a small install.
Learn the roof mount system. I want to be able to add more panels, remove
panels when working on the roof, and understand everything.
Make every day a sunny day. With my current solar panels, I get around
10x as much power on a sunny day as a cloudy day, and I have plenty of
power on sunny days. So 10x the PV capacity should be a good amount of
power all the time.
My main concerns were, would I be able to find the rafters when installing
the rails, and would the 5x3 foot panels be too unweildly to get up on the
roof by myself.
I was able to find the rafters, without needing a stud finder, after I
removed the roof's vent caps, which exposed the rafters. The shingles were
on straight enough that I could follow the lines down and drilled into the
rafter on the first try every time. And I got the rails on spaced well and
straight, although I could have spaced the FlashFeet out better (oops).
My drill ran out of juice half-way, and I had to hack it to recharge on
solar power, but that's another story. Between the learning curve, a lot of
careful measurement, not the greatest shoes for roofing, and waiting for
recharging, it took two days to get the 8 FlashFeet installed and the rails
mounted.
Taking a break from that and swimming in the river, I realized I should
have been wearing my water shoes on the roof all along. Super soft and
nubbly, they make me feel like a gecko up there! After recovering from an
(unrelated) achilles tendon strain, I got the panels installed today.
Turns out they're not hard to handle on the roof by myself. Getting them up
a ladder to the roof by yourself would normally be another story, but my
house has a 2 foot step up from the back retaining wall to the roof, and
even has a handy grip beam as you step up.
The last gotcha, which I luckily anticipated, is that panels will slide
down off the rails before you can get them bolted down. This is where a
second pair of hands would have been most useful. But, I macguyvered a
solution, attaching temporary clamps before bringing a panel up, that
stopped it sliding down while I was attaching it.
I also finished the outside wiring today. Including the one hack of this
install so far. Since the local hardware store didn't have a suitable
conduit to bring the cables off the roof, I cobbled one together from pipe,
with foam inserts to prevent chafing.
While I have 1 kilowatt of power on my roof now, I won't be able to use it
until next week. After ordering the upgrade, I realized that my old PWM
charge controller would be able to handle less than half the power, and to
get even that I would have needed to mount the fuse box near the top of the
roof and run down a large and expensive low-voltage high-amperage cable,
around OO AWG size. Instead, I'll be upgrading to a MPPT controller, and
running a single 150 volt cable to it.
Then, since the MPPT controller can only handle 1 kilowatt when it's
converting to 24 volts, not 12 volts, I'm gonna have to convert the
entire house over from 12V DC to 24V DC, including changing all the light
fixtures and rewiring the battery bank...
While visiting our Raleigh office, I managed to crack the glass on the screen of my OnePlus 3. Luckily it was a clean crack from the left upper corner, to the right lower one. The crack was not really interfering with neither touch nor display, so I had not much pressure in fixing it.
eBay lists new LCD sets for 110-130 , and those still require manual work of getting the LCD assembly out of the case, replacing it, etc. There are also glass-only sets for ~20 , but these require the complete removal of the glued glass part from the screen, and reattaching it, nothing you want to do at home. But there is also still the vendor, who can fix it, right? Internet suggested they would do it for about 100 , which seemed fair.
As people have been asking about the support experience, here is a quick write up what happened:
Opened the RMA request online on Sunday, providing a brief description of the issue and some photos
Monday morning answer from the support team, confirming this is way out of warranty, but I can get the device fixed for about 93
After confirming that the extra cost is expected, I had an UPS sticker to ship the device to CTDI in Poland
UPS even tried a pick-up on Tuesday, but I was not properly prepared, so I dropped the device later at a local UPS point
It arrived in Poland on Wednesday
On Thursday the device was inspected, pictures made etc
Friday morning I had a quote in my inbox, asking me to pay 105 - the service partner decided to replace the front camera too, which was not part of the original 93 approximation.
Paid the money with my credit card and started waiting.
The actual repair happened on Monday.
Quality controlled on Tuesday.
Shipped to me on Wednesday.
Arrived at my door on Thursday.
All in all 9 working days, which is not great, but good enough IMHO. And the repair is good, and it was not (too) expensive. So I am a happy user of an OnePlus 3 again.
Well, almost. Before sending the device for repairs, had to take a backup and wipe it. I would not send it with my, even encrypted, data on it. And backups and Android is something special.
Android will backup certain data to Google, if you allow it to. Apps can forbid that. Sadly this also blocks non-cloud backups with adb backup. So to properly backup your system, you either need root or you create a full backup of the system in the recovery and restore that.
I did the backup using TWRP, transferred it to my laptop, wiped the device, sent it in, got it back, copied the backup to the phone, restored it and... Was locked out of the device, it would not take my password anymore. Well, it seems that happens, just delete some files and it will be fine.
It's 2017, are backups of mobile devices really supposed to be that hard?!
In my previous blog on the topic of software defined radio (SDR), I provided a quickstart guide to using gqrx, GNU Radio and the RTL-SDR dongle to receive FM radio and the amateur 2 meter (VHF) band.
Using the same software configuration and the same RTL-SDR dongle, it is possible to add some extra components and receive ham radio and shortwave transmissions from around the world.
Here is the antenna setup from the successful SDR workshop at OSCAL'17 on 13 May:
After the workshop on Saturday, members of the OSCAL team successfully reconstructed the SDR and antenna at the Debian info booth on Sunday and a wide range of shortwave and ham signals were detected:
Here is a close-up look at the laptop, RTL-SDR dongle (above laptop), Ham-It-Up converter (above water bottle) and MFJ-971 ATU (on right):
Buying the parts
Component
Purpose, Notes
Price/link to source
RTL-SDR dongle
Converts radio signals (RF) into digital signals for reception through the USB port. It is essential to buy the dongles for SDR with TCXO, the generic RTL dongles for TV reception are not stable enough for anything other than TV.
Loop antenna. Thicker wire provides better reception and is more suitable for transmitting (if you have a license) but it is heavier. The antenna I've demonstrated at recent events uses 1mm thick wire.
The actual ratio of the balun depends on the shape of the loop (square, rectangle or triangle) and the point where you attach the balun (middle, corner, etc). You may want to buy more than one balun, for example, a 4:1 balun and also a 1:1 balun to try alternative configurations. Make sure it is waterproof, has hooks for attaching a string or rope and an SO-239 socket.
5 meter RG-58 coaxial cable with male PL-259 plugs on both ends
If using more than 5 meters or if you want to use higher frequencies above 30MHz, use thicker, heavier and more expensive cables like RG-213. The cable must be 50 ohm.
I've been using the MFJ-971 for portable use and demos because of the weight. There are even lighter and cheaper alternatives if you only need to receive.
Used for power to the up-converter. A spare USB mobile phone charge plug may be suitable.
~ 5
String or rope
For mounting the antenna. A ligher and cheaper string is better for portable use while a stronger and weather-resistent rope is better for a fixed installation.
5
Building the antenna
There are numerous online calculators for measuring the amount of enamelled copper wire to cut.
For example, for a centre frequency of 14.2 MHz on the 20 meter amateur band, the antenna length is 21.336 meters.
Add an extra 24 cm (extra 12 cm on each end) for folding the wire through the hooks on the balun.
After cutting the wire, feed it through the egg insulators before attaching the wire to the balun.
Measure the extra 12 cm at each end of the wire and wrap some tape around there to make it easy to identify in future. Fold it, insert it into the hook on the balun and twist it around itself. Use between four to six twists.
Strip off approximately 0.5cm of the enamel on each end of the wire with a knife, sandpaper or some other tool.
Insert the exposed ends of the wire into the screw terminals and screw it firmly into place. Avoid turning the screw too tightly or it may break or snap the wire.
Insert string through the egg insulators and/or the middle hook on the balun and use the string to attach it to suitable support structures such as a building, posts or trees. Try to keep it at least two meters from any structure. Maximizing the surface area of the loop improves the performance: a circle is an ideal shape, but a square or 4:3 rectangle will work well too.
For optimal performance, if you imagine the loop is on a two-dimensional plane, the first couple of meters of feedline leaving the antenna should be on the plane too and at a right angle to the edge of the antenna.
Join all the other components together using the coaxial cables.
Configuring gqrx for the up-converter and shortwave signals
Inspect the up-converter carefully. Look for the crystal and find the frequency written on the side of it. The frequency written on the specification sheet or web site may be wrong so looking at the crystal itself is the best way to be certain. On my Ham It Up, I found a crystal with 125.000 written on it, this is 125 MHz.
Launch gqrx, go to the File menu and select I/O devices. Change the LNB LO value to match the crystal frequency on the up-converter, with a minus sign. For my Ham It Up, I use the LNB LO value -125.000000 MHz.
Click OK to close the I/O devices window.
On the Input Controls tab, make sure Hardware AGC is enabled.
On the Receiver options tab, change the Mode value. Commercial shortwave broadcasts use AM and amateur transmission use single sideband: by convention, LSB is used for signals below 10MHz and USB is used for signals above 10MHz. To start exploring the 20 meter amateur band around 14.2 MHz, for example, use USB.
In the top of the window, enter the frequency, for example, 14.200 000 MHz.
Now choose the FFT Settings tab and adjust the Freq zoom slider. Zoom until the width of the display is about 100 kHZ, for example, from 14.15 on the left to 14.25 on the right.
Click the Play icon at the top left to start receiving. You may hear white noise. If you hear nothing, check the computer's volume controls, move the Gain slider (bottom right) to the maximum position and then lower the Squelch value on the Receiver options tab until you hear the white noise or a transmission.
Adjust the Antenna Tuner knobs
Now that gqrx is running, it is time to adjust the knobs on the antenna tuner (ATU). Reception improves dramatically when it is tuned correctly. Exact instructions depend on the type of ATU you have purchased, here I present instructions for the MFJ-971 that I have been using.
Turn the TRANSMITTER and ANTENNA knobs to the 12 o'clock position and leave them like that. Turn the INDUCTANCE knob while looking at the signals in the gqrx window. When you find the best position, the signal strength displayed on the screen will appear to increase (the animated white line should appear to move upwards and maybe some peaks will appear in the line).
When you feel you have found the best position for the INDUCTANCE knob, leave it in that position and begin turning the ANTENNA knob clockwise looking for any increase in signal strength on the chart. When you feel that is correct, begin turning the TRANSMITTER knob.
Listening to a transmission
At this point, if you are lucky, some transmissions may be visible on the gqrx screen. They will appear as darker colours in the waterfall chart. Try clicking on one of them, the vertical red line will jump to that position. For a USB transmission, try to place the vertical red line at the left hand side of the signal. Try dragging the vertical red line or changing the frequency value at the top of the screen by 100 Hz at a time until the station is tuned as well as possible.
Try and listen to the transmission and identify the station. Commercial shortwave broadcasts will usually identify themselves from time to time. Amateur transmissions will usually include a callsign spoken in the phonetic alphabet. For example, if you hear "CQ, this is Victor Kilo 3 Tango Quebec Romeo" then the station is VK3TQR. You may want to note down the callsign, time, frequency and mode in your log book. You may also find information about the callsign in a search engine.
The video demonstrates reception of a transmission from another country, can you identify the station's callsign and find his location?
If you have questions about this topic, please come and ask on the Debian Hams mailing list. The gqrx package is also available in Fedora and Ubuntu but it is known to crash on startup in Ubuntu 17.04. Users of other distributions may also want to try the Debian Ham Blend bootable ISO live image as a quick and easy way to get started.
It's been a long time I did not write any new blog posts, and finally I got
something which is interesting enough for a new post and so here it is.
I actually wanted some bills from my ISP for some work and I could not find mail
from the ISP which had bills for some specific months in my mailbox. Problem
with my ISP is bills are accessible in their account which can be only accessed
from their own network. They do have a mobile app and that does not seem to work
especially for the billing section. I used mobile app and selected month for
which I did not have bill and clicked Send Mail button. App happily showed
message saying it sent the bill to my registered mail address but that was a
fancy lie. After trying several time I gave up and decided I will do it once I
get back home.
Fast forward few hours, I'm back home from office and then I sat in front of my
laptop and connected to ISP site, promptly downloaded the bills, then used
notmuch-emacs and fire up a mail composer, attach those HTML file (yeah they
produce bill in HTML file :-/) send it to my gmail and forget about it.
Fast forward few more days, I just remember I need those bills. I got hold of
mail I sent earlier in gmail inbox and clicked on attachment and when browser
opened the attachment I was shocked/surprised . Did you ask why?. See what I saw
when I opened attachment.
Well I was confused for moment on what happened, I tried downloading the file
and opened it an editor, and I see Chinese characters here also. After reaching
home I checked the Sent folder in my laptop where I keep copy of mails sent
using notmuch-emacs's notmuch-fcc-dirs variable. I open the file and open
the attachement and I see same character as I saw in browser!. I open the
original bills I downloaded and it looks fine. To check if I really attached the
correct files I again drafted a mail this time to my personal email and sent it.
Now I open the file from Sent folder and voila again there is different content
inside my attachment!. Same happens when I receive the mail and open the
attachment everything inside is Chinese characters!. Totally lost I finally
opened the original file using emacs, since I use spacemacs it asked me for
downloading of html layer and after which I was surprised because everything
inside the editor is in Chinese!. OK finally I've something now so I opened same
file at same time in nano from terminal and there it looks fine!. OK that is
weird again I read carefully content and saw this line in beginning of file
OK that is new XML tag had encoding declared as UTF-16, really?. And just for
checking I changed it to UTF-8 and voila file is back to normal in Emacs
window!. To confirm this behavior I created a sample file with following content
Yeah with long line because ISP had similar case and now I opened the same file
in nano using terminal and changed encoding="UTF-8" to encoding="UTF-16" and
the behavior repeated I see Chinese character in the emacs buffer which has also
opened the same file.
Below is the small gif showing this happening in real time, see what happens in
emacs buffer when I change the encoding in terminal below. Fun right?.
I made following observation from above experiments.
When I open original file in browser or my sample file with
encoding="UTF-16" its normal, no Chinese characters.
When I attach the mail and send it out the attachment some how gets converted
into HTML file with Chinese characters and viewing source from browser shows
header containing xml declarations and original <html> declarations get
ripped off and new tags show up which I've pasted below.
If I download the same file and open in editor only Chinese characters are
present and no HTML tags inside it. So definitely the new tags which I saw by
viewing source in browser is added by Firefox.
I create similar HTML file and change encoding I can see the characters
changing back and forth in emacs web-mode when I change encoding of the
file.
<!DOCTYPE HTML PUBLIC "-//W3C//DTD HTML 4.01 Transitional//EN"><html><head><METAhttp-equiv="Content-Type"content="text/html; charset=utf-8">
So if I'm understanding this correctly, Emacs due to encoding declaration
interprets the actual contents differently. To see how Emacs really
interpreted the content I opened the sent mail I had in raw format and saw
following header lines for attachment.
This was followed with base64 encoded data. So does this mean emacs interpreted
the content as UTF-16 and encoded the content using UTF-8?. Again I've no clue,
so I changed the encoding in both the files to be as UTF-8 and sent the mail
by attaching these files again to see what happens. And my guess was right I
could get the attachment as is on the receiving side. And inspecting raw mail
the attachment headers now different than before.
See how Content-Type its different now also see the
Content-Transfer-Encoding its now quoted-printable as opposed to base64
earlier. Additionally I can see HTML content below the header.
When I opened the attachment from mail I get the actual bill.
As far as I understand base64 encoding is used when the data to be attached is
base64. So I guess basically due to wrong encoding declared inside the file
Emacs interpreted the content as a binary data and encoded it differently than
what it really should be. Phew that was a lot of investigation to understand the
magic but it was worth it.
Do let me know your thoughts on this.
These tricks show Feynman taking the method of thought he learned in pure
science and applying it to the more mundane topics most of us have to deal with
every day.
Abstract: Through an unlikely series of coincidences and fortunate accidents,
the development of Parkinson s disease in several illicit drug users was traced
to their use of a meperidine analog contaminated with
1-methyl-4-phenyl-1,2,3,6-tetrahydropyridine (MPTP). The discovery of a
chemical capable of producing animal models of the disease has revitalized
research efforts and resulted in important new information. The serendipitous
finding also prompted consideration of what changes seem advisable if designer
drugs are to be dealt with more efficaciously.
The Debunking Handbook, a guide to debunking misinformation, is now freely
available to download. Although there is a great deal of psychological research
on misinformation, there's no summary of the literature that offers practical
guidelines on the most effective ways of reducing the influence of myths.
An apparent interference source began plaguing wireless vehicle key fobs,
cell phones, and other wireless electronics. Key fob owners found they could
not open or start their vehicles remotely until their vehicles were towed at
least a block away, nor were they able to call for help on their cell phones
when problems occurred
Recently, Digital Ocean (which I am a customer of) asked me "how they were doing". Well, yet another survey... Let's ignore this one for now... I thought some days ago.
And then yesterday, I added IPv6 support to my main mail server (which runs at Hetzner, Germany). All my hosted/rented/whatever systems report back to this main mailserver. Now that that main mail server finally has its AAAA record and its own IPv6 address, all associated systems try to reach this main mail server via IPv6. Of course.
Crippling IPv6 support by adding Port Blocks
But, then, I see messages like these in my syslog files on droplets hosted at Digital Ocean:
Apr 13 10:10:59 <do-droplet> postfix/smtp[23469]: connect to mail.<mydomain>[<ipv6-address>]:25: Connection timed out
After some more research [1], I realized that the folks out there at DO really apply some port blockings to IPv6 networks, but not to IPv4 networks. Pardon me? From my DO droplets, I can nmap any port on my mail server (25,80,143,443, 465, 587, etc.) via the IPv4 connection, but not over the IPv6 connection. Wait, not fully true: ports 80 and 443 are not blocked, but the other aforementioned ports are definitely blocked.
Is Digital Ocean a professional ISP or a WiFi hotspot provider at my nearest coffee place? (This really makes me scratch my head...).
Routing only the first 16 addresses of allocated /64 prefixes
The above was the second IPv6 brokeness I learned about DO, recently. An earlier issue with DO's IPv6 support, I encountered while I was deploying an IPv6 capable OpenVPN internet gateway via a droplet hosted at DO. Digital Ocean assigns full IPv6 /64 prefixes to each individual droplet (which is great), but only properly routes the first 16 IP addresses of such a /64 prefix [2]. Urgh? I had to work around this flaw by adding an IPv6-over-IPv4 tunnel and attaching an IPv6 /56 prefix obtained from Hurricane Electrics' tunnel broker service [3] to the OpenVPN server.
Thanks, Digital Ocean, for reminding me about giving feedback
So, today, I luckily received a reminder mail about DO's yet-another-survey survey. My opportunity!!! Here is the feedback, I gave:
DO service is basically good.
BUT: You as a provider SUCK when it comes to IPv6.
(1) http://pixelschatten.net/blocked-ipv6-ports/
-> SMTP/IMAP traffic blocked over IPv6, but not over IPv4... WTF?). I normally have all my systems report back to my main mail server. I expect this to work as it is the default on all Linux hosts nowadays, and that is: prefer IPv6 over IPv4.
(2) https://digitalocean.uservoice.com/forums/136585-digitalocean/suggestion...
-> Droplets get a full /64 prefix assigned, but only the first 16 addresses (or such) get routed properly. WTF?
Please do your homework on IPv6 and don't cripple your service by offering crippled IPv6 support.
I tell people, DO is great, but their IPv6 support is broken-by-design. Let me know, once this is about to change.
Mike Gabriel (aka sunweaver at debian dot org, Debian Developer)
Apology for the tone of the wording
Now reading the feedback given, I realize that my tone has been quite impolite. I am sorry about this. However, the experienced IPv6 issues are indeed annoying. So please excuse me for having expressed my annoyance with such harsh words. And... I am still annoyed about myself paying an ISP for such a crippled IPv6 support. (I need to consider migrating the VMs to another hoster, unless there will be some dynamics observable in the near future).
@Digital Ocean: Keep up the good work that you do in the realm of VM hosting. Evolve and grow up in the realm of IPv6 networking. Thank you!
light+love
Mike
[1] http://pixelschatten.net/blocked-ipv6-ports/
[2] https://digitalocean.uservoice.com/forums/136585-digitalocean/suggestion...
[3] https://tunnelbroker.net/
I decided to rethink the state of my personal site, and try out some of the new
static site generators that are available now.
To do that, I jotted down a series of things that I want in a static site
generator, then wrote a tool to
convert my ikiwiki site to other formats, and set out
to evaluate things.
As a benchmark I did a full rebuild of my site, which currently contains
1164 static files and 458 markdown pages.
My requirements
Free layout for my site
My / is mostly a high-level index to the site contents.
Blog posts are at /blog.
My talk archive is organised like a separate blog at /talks.
I want the freedom to create other sections of the site, each with its own rss
feed, located wherever I want in the site hierarchy.
Assets next to posts
I occasionally blog just a photo with a little
comment, and I would like the .md page with the
comment to live next to the image in the file system.
I did not even know that I had this as a requirement until I found static site
generators that mandated a completely different directory structure for
markdown contents and for static assets.
Multiple RSS/Atom feeds
I want at least one RSS/Atom feed per tag, because I use tags for marking which
articles go to http://planet.debian.org.
I also want RSS/Atom feeds for specific parts of the site, like the
blog and talks.
Arbitrary contents in /index.html
I want total control over the contents of the main home page of the site.
Quick preview while editing contents
I do not like to wait several seconds for the site to be rebuilt at every
review iteration of the pages I write.
This makes me feel like the task of editing is harder than it should, and makes
me lose motivation to post.
Reasonable time for a full site rebuild
I want to be able to run a full rebuild of the site in a reasonable time.
I could define "reasonable" in this case as how long I can stare at the screen
without getting bored, starting to do something else, and forgetting what it
was that I was doing with the site.
It is ok if a rebuild takes something like 10 or 30 seconds. It is not ok if it
takes minutes.
Code and dependency ecosystems that I can work with
I can deal with Python and Go.
I cannot deal with Ruby or JavaScript.
I forgot all about Perl.
Also, if it isn't in Debian it does not exist.
Decent themes out of the box
One of my hopes in switching to a more mainstream generator is to pick and
choose themes and easily give my site a more modern look.
Hugo
Hugo is written in Go and is in Debian testing.
Full rebuild time for my site is acceptable, and it can even parallelize:
  $ time hugo
  real      0m5.285s
  user      0m9.556s
  sys       0m1.052s
Free layout for my site was hard to get.
I could replace /index.html by editing the template page for it, but then I
did not find out how to create another similar index in an arbitrary place.
Also, archetypes are applied only on the first path component of new posts, but
I would like them instead to be matched on the last path component first, and
failing that traveling up to the path until the top. This should be easy to fix
by reorganizing the content a bit around
here
For example, a path for a new blog post of mine could be blog/2016/debian/
and I would like it to match the debian archetype first, and failing that the
blog archetype.
Assets next to posts almost work.
Hugo automatically generates one feed per taxonomy element, and one feed per
section. This would be currently
sufficient for me, although I don't like the idea that sections map 1 to 1 to
toplevel directories in the site structure.
Hugo has a server that watches the file system and rerenders pages as they are
modified, so the quick preview while editing works fine.
About themes, it took me several tries to find a theme that would render
navigation elements for both sections and tags, and most themes would render by
pages with white components all around, and expect me to somehow dig in and
tweak them. That frustrated me, because for quite a while I could not tell if I
had misconfigured Hugo's taxonomies or if the theme was just somehow
incomplete.
Nikola
Nikola is written in Python and is in Debian testing.
Full rebuild time for my site is almost two orders of magnitude more than Hugo,
and I am miffed to find the phrases "Nikola is fast." or "Fast building
process" in its front page and package description:
  $ time nikola build
  real      3m31.667s
  user      3m4.016s
  sys       0m24.684s
Free layout could be achieved fiddling with the site configuration to tell it
where to read sources.
Assets next to post work after tweaking the configuration, but they require to
write inconsistent links in the markdown source:
https://github.com/getnikola/nikola/issues/2266
I have a hard time accepting that that, because I want to author content with
consistent semantic interlinking, because I want to be able 10 years from now
to parse it and convert it to something else if a new technology comes out.
Nikola generates one RSS/Atom feed per tag just fine. I have not tried
generating feeds for different sections of the site.
Incremental generation inside its built in server works fine.
Pelican
Pelican is written in Python and is in Debian
testing.
Full rebuild time for my site is acceptable:
  $ time pelican -d
  real      0m18.207s
  user      0m16.680s
  sys       0m1.448s
By default, pelican seems to put generate a single flat directory of html files
regardless of the directory hierarchy of the sources. To have free layout,
pelican needs some convincing in the configuration:
but even if I do that, the urls that it generates still point to just
slug /index.html and I have not trivially found a configuration option to
fix that accordingly. I got quite uncomfortable at the idea of needing to
configure content generation and linking to match, instead of having one
automatically being in sync with the other.
Having assets next to posts seems to be possible
(also setting STATIC_PATHS = ["."]), but I do not recall making progress on
this front.
I did not manage to generate a feed for each tag out of the box, and probably
there is some knob in the configuration for it.
I gave up with Pelican as trying it out felt like a constant process of
hacking the configuration from defaults that do not make any sense for me,
withouth even knowing if a configuration exists that would do what I need
Ikiwiki
Ikiwiki is written in Perl and is in Debian. Although
I am not anymore proficient with Perl, I was already using it, so it was worth
considering.
Full rebuild time feels a bit on the slow side but is still acceptable:
  $ time ikiwiki --setup site.setup
  real      0m37.356s
  user      0m34.488s
  sys       0m1.536s
In terms of free site structure, all feeds for all or part of the site, ikiwiki
just excels.
I even considered writing a python web server that monitors the file system and
calls ikiwiki --refresh when anything changes, and calling it a day.
However, when I tried to re-theme my website around a simple bootstrap
boilerplate, I found that to be hard, as a some of the HTML structure is
hardcoded in Perl
(and it's also my fault) and there is only so much that can be done by tweaking
the (rather unreadable) templates.
siterefactor
During all these experiments I had built siterefactor
to generate contents for all those static site engines, and it was going
through all the contents quite fast:
  $ time ./siterefactor src dst -t hugo
  real  0m1.222s
  user  0m0.904s
  sys   0m0.308s
So I wondered how slow it would become if, instead of making it write markdown,
I made it write HTML via python markdown
and Jinja2:
  $ time ./siterefactor ~/zz/ikiwiki/pub/ ~/zz/ikiwiki/web -t web
  real  0m6.739s
  user  0m5.952s
  sys   0m0.416s
I then started wondering how slower it would become if I implemented
postprocessing of all local URLs generated by Markdown to make sure they are
kept consistent even if the path of a generated page is different than the path
of its source. Not much slower, really.
I then added taxonomies. And arbitrary Jinja2 templates in the input, able to
generate page lists and RSS/Atom feeds.
And theming.
And realised that reading all the sources and cross-linking them took 0.2
seconds, and the rest was generation time. And that after cross-linking, each
page can be generated independently from all the others.
staticsite
So my site is now generated with staticsite:
  $ time ssite build
  real  0m6.833s
  user  0m5.804s
  sys   0m0.500s
It's comparable with Hugo, and on a single process.
Back in 2010 when I needed an ADSL2 router in the US I bought a Netgear DGN3500. It did what I wanted out of the box and being based on a MIPS AR9 (ARX100) it seemed likely OpenWRT support might happen. Long story short I managed to overwrite u-boot (the bootloader) while flashing a test image I d built. I ended up buying a new router (same model) to get my internet connection back ASAP and never getting around to fully fixing the broken one. Until yesterday. Below is how I fixed it; both for my own future reference and in case it s of use any any other unfortunate soul.
The device has clear points for serial and JTAG and it was easy enough (even with my basic soldering skills) to put a proper header on. The tricky bit is that the flash is connected via SPI, so it s not just a matter of attaching JTAG, doing a scan and reflashing from the JTAG tool. I ended up doing RAM initialisation, then copying a RAM copy of u-boot in and then using that to reflash. There may well have been a better way, but this worked for me. For reference the failure mode I saw was an infinitely repeating:
ROM VER: 1.1.3
CFG 05
My JTAG device is a Bus Pirate v3b which is much better than the parallel port JTAG device I built the first time I wanted to do something similar. I put the latest firmware (6.1) on it.
All of this was done from my laptop, which runs Debian testing (stretch). I used the OpenOCD 0.9.0-1+b1 package from there.
Daniel Schwierzeck has some OpenOCD scripts which include a target definition for the ARX100. I added a board definition for the DGN3500 (I ve also send Daniel a patch to add this to his repo).
I tied all of this together with an openocd.cfg that contained:
I was then able to power on the router and type dgn3500_ramboot into the OpenOCD session. This fetched my RAM copy of u-boot from dgn3500_ram/u-boot.bin, copied it into the router s memory and started it running. From there I had a u-boot environment with access to the flash commands and was able to restore the original Netgear image (and once I was sure that was working ok I subsequently upgraded to the Barrier Breaker OpenWRT image).
The recent AWS introduction of the Elastic File System gives you an automatic grow-and-shrink capability as an NFS mount, an exciting option that takes away the previous overhead in creating shared block file systems for EC2 instances.
However it should be noted that the same auto-management of capacity is not true in the EC2 instance s Elastic Block Store (EBS) block storage disks; sizing (and resizing) is left to the customer. With current 2015 EBS, one cannot simply increase the size of an EBS Volume as the storage becomes full; (as at June 2015) an EBS volume, once created, has fixed size. For many applications, that lack of resize function on its local EBS disks is not a problem; many server instances come into existence for a brief period, process some data and then get Terminated, so long term managment is not needed.
However for a long term data store on an instance (instead of S3, which I would recommend looking closely at from a durability and pricing fit), and where I want to harness the capacity to grow (or shrink) disk for my data, then I will need to leverage some slightly more advanced disk management. And just to make life interesting, I wish to do all this while the data is live and in-use, if possible.
Enter: Logical Volume Management, or LVM. It s been around for a long, long time: LVM 2 made a debut around 2002-2003 (2.00.09 was Mar 2004) and LVM 1 was many years before that so it s pretty mature now. It s a powerful layer that sits between your raw storage block devices (as seen by the operating system), and the partitions and file systems you would normally put on them.
In this post, I ll walk through the process of getting set up with LVM on Debian in the AWS EC2 environment, and how you d do some basic maintenance to add and remove (where possible) storage with minimal interruption.
Getting Started
First a little prep work for a new Debian instance with LVM.
As I d like to give the instance its own ability to manage its storage, I ll want to provision an IAM Role for EC2 Instances for this host. In the AWS console, visit IAM, Roles, and I ll create a new Role I ll name EC2-MyServer (or similar), and at this point I ll skip giving it any actual privileges (later we ll update this). As at this date, we can only associate an instance role/profile at instance launch time.
Now I launch a base image Debian EC2 instance launched with this IAM Role/Profile; the root file system is an EBS Volume. I am going to put data that I ll be managing on a separate disk from the root file system.
First, I need to get the LVM utilities installed. It s a simple package to install: the lvm2 package. From my EC2 instance I need to get root privileges (sudo -i) and run:
apt update && apt install lvm2
After a few moments, the package is installed. I ll choose a location that I want my data to live in, such as /opt/. I want a separate disk for this task for a number of reasons:
Root EBS volumes cannot currently be encrypted using Amazon s Encrypted EBS Volumes at this point in time. If I want to also use AWS encryption option, it ll have to be on a non-root disk. Note that instance-size restrictions also exist for EBS Encrypted Volumes.
It s possibly not worth make a snapshot of the Operating System at the same time as the user content data I am saving. The OS install (except the /etc/ folder) can almost entirely be recreated from a fresh install. so why snapshot that as well (unless that s your strategy for preserving /etc, /home, etc).
The type of EBS volume that you require may be different for different data: today (Apr 2015) there is a choice of Magnetic, General Purpose 2 (GP2) SSD, and Provisioned IO/s (PIOPS) SSD, each with different costs; and depending on our volume, we may want to select one for our root volume (operating system), and something else for our data storage.
I may want to use EBS snapshots to clone the disk to another host, without the base OS bundled in with the data I am cloning.
I will create this extra volume in the AWS console and present it to this host. I ll start by using a web browser (we ll use CLI later) with the EC2 console.
The first piece of information we need to know is where my EC2 instance is running. Specifically, the AWS Region and Availability Zone (AZ). EBS Volumes only exist within the one designated AZ. If I accidentally make the volume(s) in the wrong AZ, then I won t be able to connect them to my instance. It s not a huge issue, as I would just delete the volume and try again.
I navigate to the Instances panel of the EC2 Console, and find my instance in the list:
A (redacted) list of instance from the EC2 console.
Here I can see I have located an instance and it s running in US-East-1A: that s AZ A in Region US-East-1. I can also grab this with a wget from my running Debian instance by asking the MetaData server:
The returned text is simply: us-east-1a .
Time to navigate to Elastic Block Store , choose Volumes and click Create :
Creating a volume in AWS EC2: ensure the AZ is the same as your instance
You ll see I selected that I wanted AWS to encrypt this and as noted above, at this time that doesn t include the t2 family. However, you have an option of using encryption with LVM where the customer looks after the encryption key see LUKS.
What s nice is that I can do both have AWS Encrypted Volumes, and then use encryption on top of this, but I have to manage my own keys with LUKS, and should I lose them, then I can keep all the cyphertext!
I deselected this for my example (with a t2.micro), and continue; I could see the new volume in the list as creating , and then shortly afterwards as available . Time to attach it: select the disk, and either right-click and choose Attach , or from the menu at the top of the list, chose Actions -> Attach (both do the same thing).
Attaching a volume to an instance: you ll be prompted for the compatible instances in the same AZ.
At this point in time your EC2 instance will now notice a new disk; you can confirm this with dmesg tail , and you ll see something like:
[1994151.231815] xvdg: unknown partition table
(Note the time-stamp in square brackets will be different).
Previously at this juncture you would format the entire disk with your favourite file system, mount it in the desired location, and be done. But we re adding in LVM here between this raw device, and the filesystem we are yet to make .
Marking the block device for LVM
Our first operation with LVM is to put a marker on the volume to indicate it s being use for LVM so that when we scan the block device, we know what it s for. It s a really simple command:
pvcreate /dev/xvdg
The device name above (/dev/xvdg) should correspond to the one we saw from the dmesg output above. The output of the above is rather straight forward:
Physical volume "/dev/xvdg" successfully created
Checking our EBS Volume
We can check on the EBS volume which LVM sees as a Physical Volume using the pvs command.
Here we see the entire disk is currently unused.
Creating our First Volume Group
Next step, we need to make an initial LVM Volume Group which will use our Physical volume (xvdg). The Volume Group will then contain one (or more) Logical Volumes that we ll format and use. Again, a simple command to create a volume group by giving it its first physical device that it will use:
# vgcreate  OptVG /dev/xvdg
  Volume group "OptVG" successfully created
And likewise we can check our set of Volume Groups with vgs :
The Attribute flags here indicate this is writable, resizable, and allocating extents in normal mode. Lets proceed to make our (first) Logical Volume in this Volume Group:
# lvcreate -n OptLV -L 4.9G OptVG
  Rounding up size to full physical extent 4.90 GiB
  Logical volume "OptLV" created
You ll note that I have created our Logical Volume as almost the same size as the entire Volume Group (which is currently one disk) but I left some space unused: the reason for this comes down to keeping some space available for any jobs that LVM may want to use on the disk and this will be used later when we want to move data between raw disk devices.
If I wanted to use LVM for Snapshots, then I d want to leave more space free (unallocated) again.
We can check on our Logical Volume:
The attribytes indicating that the Logical Volume is writeable, is allocating its data to the disk in inherit mode (ie, as the Volume Group is doing), and that it is active. At this stage you may also discover we have a device /dev/OptVG/OptLV, and this is what we re going to format and mount. But before we do, we should review what file system we ll use.
Filesystems
Popular Linux file systems
Name
Shrink
Grow
Journal
Max File Sz
Max Vol Sz
btrfs
Y
Y
N
16 EB
16 EB
ext3
Y off-line
Y
Y
2 TB
32 TB
ext4
Y off-line
Y
Y
16 TB
1 EB
xfs
N
Y
Y
8 EB
8 EB
zfs*
N
Y
Y
16 EB
256 ZB
For more details see Wikipedia comparison. Note that ZFS requires 3rd party kernel module of FUSE layer, so I ll discount that here. BTRFS only went stable with Linux kernel 3.10, so with Debian Jessie that s a possibility; but for tried and trusted, I ll use ext4.
The selection of ext4 also means that I ll only be able to shrink this file system off-line (unmounted).
I ll make the filesystem:
# mkfs.ext4 /dev/OptVG/OptLV
mke2fs 1.42.12 (29-Aug-2014)
Creating filesystem with 1285120 4k blocks and 321280 inodes
Filesystem UUID: 4f831d17-2b80-495f-8113-580bd74389dd
Superblock backups stored on blocks:
  32768, 98304, 163840, 229376, 294912, 819200, 884736
Allocating group tables: done
Writing inode tables: done
Creating journal (32768 blocks): done
Writing superblocks and filesystem accounting information: done
And now mount this volume and check it out:
# mount /dev/OptVG/OptLV /opt/
# df -HT /opt
Filesystem  Type  Size  Used Avail Use% Mounted on
/dev/mapper/OptVG-OptLV ext4  5.1G  11M  4.8G  1% /opt
Lastly, we want this to be mounted next time we reboot, so edit /etc/fstab and add the line:
/dev/OptVG/OptLV /opt ext4 noatime,nodiratime 0 0
With this in place, we can now start using this disk. I selected here not to update the filesystem every time I access a file or folder updates get logged as normal but access time is just ignored.
Time to expand
After some time, our 5 GB /opt/ disk is rather full, and we need to make it bigger, but we wish to do so without any downtime. Amazon EBS doesn t support resizing volumes, so our strategy is to add a new larger volume, and remove the older one that no longer suits us; LVM and ext4 s online resize ability will allow us to do this transparently.
For this example, we ll decide that we want a 10 GB volume. It can be a different type of EBS volume to our original we re going to online-migrate all our data from one to the other.
As when we created the original 5 GB EBS volume above, create a new one in the same AZ and attach it to the host (perhaps a /dev/xvdh this time). We can check the new volume is visible with dmesg again:
[1999786.341602] xvdh: unknown partition table
And now we initalise this as a Physical volume for LVM:
# pvcreate /dev/xvdh
  Physical volume "/dev/xvdh" successfully created
And then add this disk to our existing OptVG Volume Group:
# vgextend OptVG /dev/xvdh
  Volume group "OptVG" successfully extended
We can now review our Volume group with vgs, and see our physical volumes with pvs:
There are now 2 Physical Volumes we have a 4.9 GB filesystem taking up space, so 10.09 GB of unallocated space in the VG.
Now its time to stop using the /dev/xvgd volume for any new requests:
# pvchange -x n /dev/xvdg
  Physical volume "/dev/xvdg" changed
  1 physical volume changed / 0 physical volumes not changed
At this time, our existing data is on the old disk, and our new data is on the new one. Its now that I d recommend running GNU screen (or similar) so you can detach from this shell session and reconnect, as the process of migrating the existing data can take some time (hours for large volumes):
During the move, checking the Monitoring tab in the AWS EC2 Console for the two volumes should show one with a large data Read metric, and one with a large data Write metric clearly data should be flowing off the old disk, and on to the new.
A note on disk throughput
The above move was a pretty small, and empty volume. Larger disks will take longer, naturally, so getting some speed out of the process maybe key. There s a few things we can do to tweak this:
EBS Optimised: a launch-time option that reserves network throughput from certain instance types back to the EBS service within the AZ. Depending on the size of the instance this is 500 MB/sec up to 4GB/sec. Note that for the c4 family of instances, EBS Optimised is on by default.
Size of GP2 disk: the larger the disk, the longer it can sustain high IO throughput but read this for details.
Size and speed of PIOPs disk: if consistent high IO is required, then moving to Provisioned IO disk may be useful. Looking at the (2 weeks) history of Cloudwatch logs for the old volume will give me some idea of the duty cycle of the disk IO.
Back to the move
Upon completion I can see that the disk in use is the new disk and not the old one, using pvs again:
So all 5 GB is now unused (compare to above, where only 96 MB was PFree). With that disk not containing data, I can tell LVM to remove the disk from the Volume Group:
# vgreduce OptVG /dev/xvdg
  Removed "/dev/xvdg" from volume group "OptVG"
Then I cleanly wipe the labels from the volume:
# pvremove /dev/xvdg
  Labels on physical volume "/dev/xvdg" successfully wiped
If I really want to clean the disk, I could choose to use shred(1) on the disk to overwrite with random data. This can take a lng time
Now the disk is completely unused and disassociated from the VG, I can return to the AWS EC2 Console, and detach the disk:
Detach an EBS volume from an EC2 instance
Wait for a few seconds, and the disk is then shown as available ; I then chose to delete the disk in the EC2 console (and stop paying for it).
Back to the Logical Volume it s still 4.9 GB, so I add 4.5 GB to it:
# lvresize -L +4.5G /dev/OptVG/OptLV
  Size of logical volume OptVG/OptLV changed from 4.90 GiB (1255 extents) to 9.40 GiB (2407 extents).
  Logical volume OptLV successfully resized
We now have 0.6GB free space on the physical volume (pvs confirms this).
Finally, its time to expand out ext4 file system:
# resize2fs /dev/OptVG/OptLV
resize2fs 1.42.12 (29-Aug-2014)
Filesystem at /dev/OptVG/OptLV is mounted on /opt; on-line resizing required
old_desc_blocks = 1, new_desc_blocks = 1
The filesystem on /dev/OptVG/OptLV is now 2464768 (4k) blocks long.
And with df we can now see:
# df -HT /opt/
Filesystem  Type  Size  Used Avail Use% Mounted on
/dev/mapper/OptVG-OptLV ext4  9.9G  12M  9.4G  1% /opt
Automating this
The IAM Role I made at the beginning of this post is now going to be useful. I ll start by adding an IAM Policy to the Role to permit me to List Volumes, Create Volumes, Attach Volumes and Detach Volumes to my instance-id. Lets start with creating a volume, with a policy like this:
This policy puts some restrictions on the volumes that this instance can create: only within the given Availability Zone (matching our instance), only GP2 SSD (no PIOPs volumes), and size no more than 250 GB. I ll add another policy to permit this instance role to tag volumes in this AZ that don t yet have a tag called InstanceId:
Now that I can create (and then tag) volumes, this becomes a simple procedure as to what else I can do to this volume. Deleting and creating snapshots of this volume are two obvious options, and the corresponding policy:
Of course it would be lovely if I could use a variable inside the policy condition instead of the literal string of the instance ID, but that s not currently possible.
Clearly some of the more important actions I want to take are to attach and detach a volume to my instance:
Now with this in place, we can start to fire up the AWS CLI we spoke of. We ll let the CLI inherit its credentials form the IAM Instance Role and the polices we just defined.
and at this stage, the above manipulation of the raw block device with LVM can begin. Likewise you can then use the CLI to detach and destroy any unwanted volumes if you are migrating off old block devices.
I've had some 8GB USB keys made, with the Debian swirl and text. By
buying a reasonable number, I've got what I think is a good price for
nice high-quality keys (metal body with a solid loop for attaching to
a keyring). I'm now selling these for 7 pounds each, and I'm planning
on bringing some to DebConf 15 too, where they'll be 10 EUR.
They're selling faster than I expected - if you're interested in
buying one (or several!), please let
me know. If there's enough demand, I may order more.
CVE-2015-3456, also known as VENOM, is a security
vulnerability in QEMU virtual floppy controller:
The Floppy Disk Controller (FDC) in QEMU, as used in Xen [ ]
and KVM, allows local guest users to cause a denial of service
(out-of-bounds write and guest crash) or possibly execute arbitrary
code via the FD_CMD_READ_ID, FD_CMD_DRIVE_SPECIFICATION_COMMAND,
or other unspecified commands.
Even when QEMU has been configured with no floppy drive, the
floppy controller code is still active. The vulnerability is easy to
test1:
Once the fix installed, all processes still have to be restarted for
the upgrade to be effective. It is possible to minimize the downtime
by leveraging virsh save.
Another possibility would be to patch the running processes. The Linux
kernel attracted a lot of interest in this area, with solutions like
Ksplice (mostly killed by Oracle), kGraft (by Red Hat) and
kpatch (by Suse) and the inclusion of a common framework in
the kernel. The userspace has far less out-of-the-box solutions2.
I present here a simple and self-contained way to patch a running
QEMU to remove the vulnerability without requiring any sensible
downtime. Here is a short demonstration:
Proof of concept
First, let s find a workaround that would be simple to implement
through live patching: while modifying running code text is possible,
it is easier to modify a single variable.
Concept
Looking at the code of the floppy controller and the
patch, we can avoid the vulnerability by not accepting any command
on the FIFO port. Each request would be answered by Invalid
command (0x80) and a user won t be able to push more bytes to the
FIFO until the answer is read and the FIFO queue reset. Of course, the
floppy controller would be rendered useless in this state. But who cares?
The list of commands accepted by the controller on the FIFO port is
contained in the handlers[] array:
To avoid browsing the array each time a command is received, another
array is used to map each command to the appropriate handler:
/* Associate command to an index in the 'handlers' array */staticuint8_tcommand_to_handler[256];staticvoidfdctrl_realize_common(FDCtrl*fdctrl,Error**errp)inti,j;staticintcommand_tables_inited=0;/* Fill 'command_to_handler' lookup table */if(!command_tables_inited)command_tables_inited=1;for(i=ARRAY_SIZE(handlers)-1;i>=0;i--)for(j=0;j<sizeof(command_to_handler);j++)if((j&handlers[i].mask)==handlers[i].value)command_to_handler[j]=i;/* [...] */
Our workaround is to modify the command_to_handler[] array to map
all commands to the fdctrl_unimplemented() handler (the last one in
the handlers[] array).
Testing with gdb
To check if the workaround works as expected, we test it with
gdb. Unless you have compiled QEMU yourself, you need to install a
package with debug symbols. Unfortunately, on Debian, they are not
available, yet3. On Ubuntu, you can install the
qemu-system-x86-dbgsym package after
enabling the appropriate repositories.
The following function for gdb maps every command to the
unimplemented handler:
define patch set $handler = sizeof(handlers)/sizeof(*handlers)-1 set $i = 0 while ($i < 256) set variable command_to_handler[$i++] = $handler end printf "Done!\n"end
Attach to the vulnerable process (with attach), call the function
(with patch) and detach of the process (with detach). You can
check that the exploit is not working anymore. This could be
easily automated.
Limitations
Using gdb has two main limitations:
It needs to be installed on each host to be patched.
The debug packages need to be installed as well. Moreover, it can
be difficult to fetch previous versions of those packages.
Writing a custom patcher
To overcome those limitations, we can write a customer patcher
using the ptrace() system call without relying on debug
symbols being present.
Finding the right memory spot
Before being able to modify the command_to_handler[] array, we need
to know its location. The first clue is given by the symbol table. To
query it, use readelf -s:
$ readelf -s /usr/lib/debug/.build-id/09/95121eb46e2a4c13747ac2bad982829365c694.debug \> sed -n -e 1,3p -e /command_to_handler/p
Symbol table '.symtab' contains 27066 entries: Num: Value Size Type Bind Vis Ndx Name 8485: 00000000009f9d00 256 OBJECTLOCALDEFAULT 26 command_to_handler
This table is usually stripped out of the executable to save space,
like shown below:
If your distribution provides a debug package, the debug symbols are
installed in /usr/lib/debug. Most modern distributions are now
relying on the build ID4 to map an executable to its
debugging symbols, like the example above. Without a debug package,
you need to recompile the existing package without stripping debug
symbols in a clean environment5. On Debian, this can be
done by setting the DEB_BUILD_OPTIONS environment variable to
nostrip.
We have now two possible cases:
the easy one, and
the hard one.
The easy case
On x86, here is the standard layout of a regular Linux process in
memory6:
The random gaps (ASLR) are here to prevent an attacker from reliably
jumping to a particular exploited function in memory. On x86-64, the
layout is quite similar. The important point is that the base
address of the executable is fixed.
The memory mapping of a process is also available through
/proc/PID/maps. Here is a shortened and annotated example on x86-64:
With a regular executable, the value given in the symbol table is
an absolute memory address:
$ readelf -s not-qemu \> sed -n -e 1,3p -e /command_to_handler/p
Symbol table '.dynsym' contains 9 entries: Num: Value Size Type Bind Vis Ndx Name 47: 0000000000602080 256 OBJECTLOCALDEFAULT 25 command_to_handler
So, the address of command_to_handler[], in the above example, is
just 0x602080.
The hard case
To enhance security, it is possible to load some executables at a
random base address, just like a library. Such an executable is called
a Position Independent Executable (PIE). An attacker won t be able
to rely on a fixed address to find some helpful function. Here is the
new memory layout:
With a PIE process, the value in the symbol table is now an offset
from the base address.
$ readelf -s not-qemu-pie sed -n -e 1,3p -e /command_to_handler/p
Symbol table '.dynsym' contains 17 entries: Num: Value Size Type Bind Vis Ndx Name 47: 0000000000202080 256 OBJECTLOCALDEFAULT 25 command_to_handler
If we look at /proc/PID/maps, we can figure out where the array is located in memory:
Patching a memory spot
Once we know the location of the command_to_handler[] array in memory,
patching it is quite straightforward. First, we start tracing
the target process:
/* Attach to the running process */staticintpatch_attach(pid_tpid)intstatus;printf("[.] Attaching to PID %d...\n",pid);if(ptrace(PTRACE_ATTACH,pid,NULL,NULL)==-1)fprintf(stderr,"[!] Unable to attach to PID %d: %m\n",pid);return-1;if(waitpid(pid,&status,0)==-1)fprintf(stderr,"[!] Error while attaching to PID %d: %m\n",pid);return-1;assert(WIFSTOPPED(status));/* Tracee may have died */if(ptrace(PTRACE_GETSIGINFO,pid,NULL,&si)==-1)fprintf(stderr,"[!] Unable to read siginfo for PID %d: %m\n",pid);return-1;assert(si.si_signo==SIGSTOP);/* Other signals may have been received */printf("[*] Successfully attached to PID %d\n",pid);return0;
Then, we retrieve the command_to_handler[] array, modify it and put it
back in memory7.
staticintpatch_doit(pid_tpid,unsignedchar*target)intret=-1;unsignedchar*command_to_handler=NULL;size_ti;/* Get the table */printf("[.] Retrieving command_to_handler table...\n");command_to_handler=ptrace_read(pid,target,QEMU_COMMAND_TO_HANDLER_SIZE);if(command_to_handler==NULL)fprintf(stderr,"[!] Unable to read command_to_handler table: %m\n");gotoout;/* Check if the table has already been patched. *//* [...] *//* Patch it */printf("[.] Patching QEMU...\n");for(i=0;i<QEMU_COMMAND_TO_HANDLER_SIZE;i++)command_to_handler[i]=QEMU_NOT_IMPLEMENTED_HANDLER;if(ptrace_write(pid,target,command_to_handler,QEMU_COMMAND_TO_HANDLER_SIZE)==-1)fprintf(stderr,"[!] Unable to patch command_to_handler table: %m\n");gotoout;printf("[*] QEMU successfully patched!\n");ret=0;out:free(command_to_handler);returnret;
Since ptrace() only allows to read or write a word at a time,
ptrace_read() and ptrace_write() are wrappers to read or write
arbitrary large chunks of memory8. Here is the code for
ptrace_read():
/* Read memory of the given process */staticvoid*ptrace_read(pid_tpid,void*address,size_tsize)/* Allocate the buffer */uword_t*buffer=malloc((size/sizeof(uword_t)+1)*sizeof(uword_t));if(!buffer)returnNULL;/* Read word by word */size_treadsz=0;doerrno=0;if((buffer[readsz/sizeof(uword_t)]=ptrace(PTRACE_PEEKTEXT,pid,(unsignedchar*)address+readsz,0))&&errno)fprintf(stderr,"[!] Unable to peek one word at address %p: %m\n",(unsignedchar*)address+readsz);free(buffer);returnNULL;readsz+=sizeof(uword_t);while(readsz<size);return(unsignedchar*)buffer;
Putting the pieces together
The patcher is provided with the following information:
the PID of the process to be patched,
the command_to_handler[] offset from the symbol table, and
the build ID of the executable file used to get this offset (as a safety measure).
The main steps are:
Attach to the process with ptrace().
Get the executable name from /proc/PID/exe.
Parse /proc/PID/maps to find the address of the text segment (it s the first one).
Do some sanity checks:
check there is a ELF header at this location (4-byte magic number),
check the executable type (ET_EXEC for regular executables, ET_DYN for PIE), and
get the build ID and compare with the expected one.
From the base address and the provided offset, compute the location of the command_to_handler[] array.
An interesting project seems to be Katana. But there
are also some insightful hackingpapers on
the subject.
Some packages come with a -dbg package with debug
symbols, some others don t. Fortunately, a proposal
to automatically produce debugging symbols for
everything is near completion.
If the build is incorrectly reproduced, the build ID
won t match. The information provided by the debug
symbols may or may not be correct. Debian currently
has a reproducible builds effort to ensure that
each package can be reproduced.
Being an uninitialized static variable, the variable is in
the BSS section. This section is mapped to a writable memory
segment. If it wasn t the case, with Linux, the ptrace()
system call is still allowed to write. Linux will copy the
page and mark it as private.
With Linux 3.2 or later, process_vm_readv()
and process_vm_writev() can be used to transfer data from/to
a remote process without using ptrace() at all. However,
ptrace() would still be needed to reliably stop the main
thread.
Choosing to call RedBoot from a hacked Apex As I was saying in my previous post, in order to be able to automate the booting of the NetBSD image via TFTP, I opted for using a 2nd stage bootloader (planning to flash it in the NSLU2 instead of a Linux kernel), and since Debian was already using Apex, I chose Apex, too.
The first problem I found was that the networking support in Apex was relying on an old version of the Intel NPE library which I couldn't find on Intel's site. The new version was incompatible/not building with the old build wrapper in Apex, so I was faced with 3 options:
Fight with the availabel Intel code and try to force it to compile in Apex
Incorporate the NPE driver from NetBSD into a rump kernel to be included in Apex instead of the original Intel code, since the NetBSD driver only needed an easily compilable binary blob
Hack together an Apex version that simulates the typing necessary RedBoot commands to load via TFTP the netbsd image and execute it.
After taking a look at the NPE driver buildsystem, I concluded there were very few options less attractive that option 1, among which was hammering nails through my forehead as a improvement measure against the severe brain damage which I would probably be likely to be inflicted with after dealing with the NPE "build system".
Option 2 looked like the best option I could have, given the situation, but my NetBSD foo was too close to 0 to even dream to endeavor on such a task. In my opinion, this still remains the technically superior solution to the problem since is very portable and a flexible way to ensure networking works in spite of the proprietary NPE code.
But, in practice, the best option I could implement at the time was option 3. I initially planned to pre-fill from Apex my desired commands into the RedBoot buffer that stored the keyboard strokes typed by the user:
load -r -b 0x200000 -h 192.168.0.2 netbsd-nfs.bin g
Since this was the first time ever for me I was going to do less than trivial reverse engineering in order to find the addresses and signatures of interesting functions in the RedBoot code, it wasn't bad at all that I had a version of the RedBoot source code.
When stuck with reverse engineering, apply JTAG The bad thing was that the code Linksys published as the source of the RedBoot running inside the NSLU2 was, in fact, a different code which had some significant changes around the code pieces I was mostly interested in. That in spite of the GPL terms.
But I thought that I could manage. After all, how hard could it be to identify the 2-3 functions I was interested in and 1 buffer? Even if I only had the disassembled code from the slug, it shouldn't be that hard.
I struggled with this for about 2-3 weeks on the few occasions I had during that time, but the excitement of leaning something new kept me going. Until I got stuck somewhere between the misalignment between the published RedBoot code and the disassembled code, the state of the system at the time of dumping the contents from RAM (for purposes of disassemby), the assembly code generated by GCC for some specific C code I didn't have at all, and the particularities of ARM assembly.
What was most likely to unblock me was to actually see the code in action, so I decided attaching a JTAG dongle to the slug and do a session of in-circuit-debugging was in order.
Luckily, the pinout of the JTAG interface was already identified in the NSLU2 Linux project, so I only had to solder some wires to the specified places and a 2x20 header to be able to connect through JTAG to the board.
JTAG connections on Kinder (the NSLU2 targeting NetBSD)
After this was done I tried immediately to see if when using a JTAG debugger I could break the execution of the code on the system. The answer was sadly, no.
The chip was identified, but breaking the execution was not happening. I tried this in OpenOCD and in another proprietary debugger application I had access to, and the result was the same, breaking was not happening.
Info : only one transport option; autoselect 'jtag'
adapter speed: 300 kHz
Info : ixp42x.cpu: hardware has 2 breakpoints and 2 watchpoints
0
Info : clock speed 300 kHz
Info : JTAG tap: ixp42x.cpu tap/device found: 0x29277013 (mfg: 0x009,
part: 0x9277, ver: 0x2)
[..]
$ telnet localhost 4444
Trying ::1...
Trying 127.0.0.1...
Connected to localhost.
Escape character is '^]'.
Open On-Chip Debugger
> halt
target was in unknown state when halt was requested
in procedure 'halt'
> poll
background polling: on
TAP: ixp42x.cpu (enabled)
target state: unknown
Looking into the documentation I found a bit of information on the XScale processors[X] which suggested that XScale processors might necessarily need the (otherwise optional) SRST signal on the JTAG interface to be able to single step the chip.
This confused me a lot since I was sure other people had already used JTAG on the NSLU2.
The options I saw at the time were:
my NSLU2 did have a fully working JTAG interface (either due to the missing SRST signal on the interface or maybe due to a JTAG lock on later generation NSLU-s, as was my second slug)
nobody ever single stepped the slug using OpenOCD or other JTAG debugger, they only reflashed, and I was on totally new ground
I even contacted Rod Whitby, the project leader of the NSLU2 project to try to confirm single stepping was done before. Rod told me he never did that and he only reflashed the device.
This confused me even further because, from what I encountered on other platforms, in order to flash some device, the code responsible for programming the flash is loaded in the RAM of the target microcontroller and that code is executed on the target after a RAM buffer with the to be flashed data is preloaded via JTAG, then the operation is repeated for all flash blocks to be reprogrammed.
I was aware it was possible to program a flash chip situated on the board, outside the chip, by only playing with the chip's pads, strictly via JTAG, but I was still hoping single stepping the execution of the code in RedBoot was possible.
Guided by that hope and the possibility the newer versions of the device to be locked, I decided to add a JTAG interface to my older NSLU2, too. But this time I decided I would also add the TRST and SRST signals to the JTAG interface, just in case single stepping would work.
This mod involved even more extensive changes than the ones done on the other NSLU, but I was so frustrated by the fact I was stuck that I didn't mind poking a few holes through the case and the prospect of a connector always sticking out from the other NSLU2, which was doing some small, yet useful work in my home LAN.
It turns out NOBODY single stepped the NSLU2 After biting the bullet and soldering JTAG interface with also the TRST and the SRST signals connected as the pinout page from the NSLU2 Linux wiki suggested, I was disappointed to observe that I was not able to single step the older NSLU2 either, in spite of the presence of the extra signals.
I even tinkered with the reset configurations of OpenOCD, but had not success. After obtaining the same result on the proprietary debugger, digging through a presentation made by Rod back in the hay day of the project and the conversations on the NSLU2 Linux Yahoo mailing list, I finally concluded:
Actually nobody single stepped the NSLU2, no matter the version of the NSLU2 or connections available on the JTAG interface!
So I was back to square 1, I had to either struggle with disassembly, reevaluate my initial options, find another option or even drop entirely the idea. At that point I was already committed to the project, so dropping entirely the idea didn't seem like the reasonable thing to do.
Since I was feeling I was really close to finish on the route I had chosen a while ago, I was not any significantly more knowledgeable in the NetBSD code, and looking at the NPE code made me feel like washing my hands, the only option which seemed reasonable was to go on.
Digging a lot more through the internet, I was finally able to find another version of the RedBoot source which was modified for Intel ixp42x systems. A few checks here and there revealed this newly found code was actually almost identical to the code I had disassembled from the slug I was aiming to run NetBSD on. This was a huge step forward.
Long story short, a couple of days later I had a hacked Apex that could go through the RedBoot data structures, search for available commands in RedBoot and successfully call any of the built-in RedBoot commands!
Testing with loading this modified Apex by hand in RAM via TFTP then jumping into it to see if things woked as expected revealed a few small issues which I corrected right away.
Flashing a modified RedBoot?! But why? Wasn't Apex supposed to avoid exactly that risky operation? Since the tests when executing from RAM were successful, my custom second stage Apex bootloader for NetBSD net booting was ready to be flashed into the NSLU2.
I added two more targets in the Makefile in the code on the dedicated netbsd branch of my Apex repository to generate the images ready for flashing into the NSLU2 flash (RedBoot needs to find a Sercomm header in flash, otherwise it will crash) and the exact commands to be executed in RedBoot are also print out after generation. This way, if the command is copy-pasted, there is no risk the NSLU2 is bricked by mistake.
After some flashing and reflashing of the apex_nslu2.flash image into the NSLU2 flash, some manual testing, tweaking and modifying the default built in APEX commands, checking that the sequence of commands 'move', 'go 0x01d00000' would jump into Apex, which, in turn, would call RedBoot to transfer the netbsd-nfs.bin image from a TFTP to RAM and then execute it successfully, it was high time to check NetBSD would boot automatically after the NSLU was powered on.
It didn't. Contrary to my previous tests, no call made from Apex to the RedBoot code would return back to Apex, not even the execution of a basic command such as the 'version' command.
It turns out the default commands hardcoded into RedBoot were 'boot; exec 0x01d00000', but I had tested 'boot; go 0x01d0000', which is not the same thing.
While 'go' does a plain jump at the specified address, the 'exec' command also does some preparations so it allows a jump into the Linux kernel and those preparations break some environment the RedBoot commands expect. I don't know which those are and didn't had the mood or motivation to find out.
So the easiest solution was to change the RedBoot's built-in command and turn that 'exec' into a 'go'. But that meant this time I was actually risking to brick the NSLU, unless I was able to reflash via JTAG the NSLU2.
(to be continued - next, changing RedBoot and bisecting through the NetBSD history)
[X] Linksys NSLU2 has an XScale IXP420 processor which is compatible at ASM level with the ARMv5TEJ instruction set
As it is nearly time to release Debian 8 (codename jessie), I've
uploaded a new version of the Linux kernel to unstable which I
hope will be the version to go into the initial release (8.0).
The changes from the current version in testing are mostly bug
fixes:
Please test this new version (which should be on mirrors within the
next 24 hours) and report any regressions you spot.
It's now too late to add new hardware support for Debian 8.0, but
we'll probably be able to improve it in subsequent point releases.
So, please also report driver changes that should be backported from
later kernel versions to improve hardware support, with severity of
'important'. If you can provide precise information about which
upstream commits are needed, that makes things easier for us, and
you should add the 'patch' tag.
It is almost exactly 1 year and a half since I came up with the idea of having a way of making backups using Rsnapshot automatically triggered by my laptop when I have the backup media connected to my laptop. This could mean connecting a USB drive directly to the laptop or mounting a NFS/sshfs share in my home network. Today I tagged Occasional Rsnapshot the v1.3.0 version, the first released version that makes sure even when you connect your backup media occasionally, your Rsnapshot backups are done if and when it makes sense to do it, according to the rsnapshot.conf file and the status of the existing backups on the backup media.
Quoting from the README, here is what Occasional Rsnapshot does:
This is a tool that allows automatic backups using rsnapshot when the external backup drive or remote backup media is connected.
Although the ideal setup would be to have periodic backups on a system that is always online, this is not always possible. But when the connection is done, the backup should start fairly quickly and should respect the daily/weekly/... schedules of rsnapshot so that it accurately represents history.
In other words, if you backup to an external drive or to some network/internet connected storage that you don't expect to have always connected (which is is case with laptops) you can use occasional_rsnapshot to make sure your data is backed up when the backup storage is connected.
occasional_rsnapshot is appropriate for:
laptops backing up on:
a NAS on the home LAN or
a remote or an internet hosted storage location
systems making backups online (storage mounted locally somehow)
systems doing backups on an external drive that is not always connected to the system
The only caveat is that all of these must be mounted in the local file system tree somehow by any arbitrary tool, occasional_rsnapshot or rsnapshot do not care, as long as the files are mounted.
So if you find yourself in a simillar situation, this script might help you to easily do backups in spite of the occasional availability of the backup media, instead of no backups at all. You can even trigger backups semi-automatically when you remember to or decide is time to backup, by simply pulging in your USB backup HDD.
One month later I was explaining my concept of a backup solution that would not trust the backup server, and leave to the clients as much as possible the decision to start the backup at their desired time. I was also pondering on the problems I might encounter.
From a security PoV, what I wanted was that:
clients would be isolated from each other
even in the case of a server compromise:
the data would not be accessible since they would be already encrypted before leaving the client
the clients could not be compromised
The general concept was sane and supplemental security measures such as port knocking and initiation of backups only during specific time frames could be added.
The problem I ran to was that when I set up this in my home network a sigle backup cycle would take more than a day, due to the fact that I wanted to do backup of all of my data and my server was a humble Linksys NSLU2 with a 3TB storage attached on USB.
Even when the initial copy was done by attaching the USB media directly to the laptop, so the backup would only copy changed data, the backup with the HDD attached to the NSLU2 was not finished even after more than 6 hours.
The bottleneck was the CPU speed and the USB speed. I tried even mounting the storage media over sshfs so the tiny xscale processor in the NSLU2 would not be bothered by any of the rsync computation. This proved to an exercise in futility, any attempt to put the NSLU2 anywhere in the loop resulted in an unacceptable and impractically long backup time.
All these attempts, of course, took time, but that meant that I was aware I still didn't have appropriate backups and I wasn't getting closer to the desired result.
So this brings us August 2013, when I realized I was trying to manually trigger Rsnapshot backups from time to time, but having to do all sorts of mental gymnastics and manual listing to evaluate if I needed to do monthly, weekly and daily backups or if weekly and daily was due.
This had to stop.
Triggering a backup should happen automatically as soon as the backup media is available, without any intervention from the user.
I said.
Then I came up with the basic concept for Occasional Rsnapshot: a very silent script that would be called from cron every 5 minutes, would check if the backup media is mounted, if is not, exit silently to not generate all sorts of noise in cron emails, but if mounted, compute which backup intervals should be triggered, and trigger them, if the appropriate amount of time passed since the most recent backup in that backup interval.
Occasional Rsnapshot version v1.3.0 is the 8th and most recent release of the script. Even if I used Occasional Rsnapshot since the day 1, v1.3.0 is the first one I can recommend to others, without fearing they might lose data due to it.
The backup media can be anything, starting from your regular USB mounted HDD, your sshfs mounted backup partition on the home NAS server to even a remote storage such as Amazon S3 online storage, and there are even brief instructions on how to do encrypted backups for the cases where you don't trust the remote storage.
So if you think you might find anything that I described remotely interesting, I recommend downloading the latest release of Occasional Rsnapshot, go through the README and trying it out.
Feedback and bug reports are welcome. Patches are welcomed with a 'thank you'. Pull requests are eagerly waited for :) .
LXC - Linux Containers allows us to run multiple isolated Linux system
under same control host. This will be useful for testing application
without changing our existing system.
To create an LXC container we use the lxc-create command, it can
accepts the template option, with which we can choose the OS we would
like to run under the virtual isolated environment. On a Debian system
I see following templates supported
For my application testing I wanted to create a Debian container for
my By default the template provided by lxc package creates Debian
stable container. This can be changed by passing the option to
debootstrap after -- as shown below.
-r switch is used to specify the release, MIRROR environment
variable is used to choose the required Debian mirror. I wanted to use
my own local approx installation, so I can save some bandwidth.
container.conf is the configuration file used for creating the LXC,
in my case it contains basic information on how container networking
should b setup. The configuration is basically taken from LXC Debian
wiki
Before launching the LXC make sure you run below command
sudo ifup eth0.1
sudo ifup br0.1
# Also give ip to bridge in same subnet as lxc.network.ipv4
sudo ip addr add 192.168.3.1/24 dev br0.1
I'm giving ip address to bridge so that I can communicate with
container from my control host, once it comes up.
Now start the container using below command
sudo lxc-start -n container -d -c tty8
We are starting lxc in daemon mode and attaching it to console
tty8. If you want, you can drop -d and -c option to start lxc in
foreground. But its better you start it in background and attach using
lxc-console command shown below.
sudo lxc-console -n container -t tty8
You can detach from console using Ctrl+a q combination and let lxc
execute in background.
Its also possible to simply ssh into the running container since we
have enabled networking.
Stopping the container should be done using lxc-stop command, but
without -k switch (kill) this command never returned. Even with
timeout container is not stopped.
sudo lxc-stop -n container
-r can be used for reboot of container. Since I couldn't get clean
shutdown I normally attach the console and issue a halt command in
container itself. Not sure if this is the right way, but it gets the
thing done.
I consider Linux container as a better alternative for spawning a
virtual Linux environment instead of running a full blown VM like
Virtualbox or VMware.
About a month ago, on 20th of March, GNU Screen had its 27th
anniversary.
A few days ago, Amadeusz S awi ski, GNU Screen s new
primary upstream maintainer, released the status quo of Screen development as version 4.2.0
(probably to distinguish it from all those 4.1.0 labeled development
snapshots floating around in most Linux distributions nowadays).
I did something similar and uploaded the status quo of Debian s
screen package in
git as 4.1.0~20120320gitdb59704-10 to Debian Sid shortly afterwards.
That upload should hit Jessie soon, too, resolving the following two
issues also in Testing:
#740301: proper systemd support Thanks Josh Triplett
for his help!
#735554: fix for multiuser usage Thanks Martin von
Wittich for spotting this issue!
That way I could decouple these packaging fixes/features from the new
upstream release which I uploaded to Debian Experimental for now. Testers for the 4.2.0-1
package are very welcome!
Oh, and by the way, that upstream comment (or ArchLinux s according announcement) about broken backwards
compatibility with attaching to running sessions started with older
Screen releases doesn t affected Debian since that has been fixed in Debian
already with the package which is in Wheezy. (Thanks again Julien
Cristau for the patch back then!)
While there are bigger long-term plans at upstream, Amadeusz is
already working on the next 4.x release (probably named 4.2.1) which
will likely incorporate some of the patches floating around in the
Linux distributions packages. At least SuSE and Debian offered their
patches explicitly for upstream inclusion.
So far already two patches found in the Debian packages have been
obsoleted by upstream git commits after the 4.2.0 release. Yay!
Problem description: One of my customers had a problem with their Selenium tests in the Jenkins continuous integration system. While Perl s Test::WebDriver still worked just fine the Selenium tests using Ruby s selenium-webdriver suddenly reported failures. The problem was caused by Debian wheezy s upgrade of the Iceweasel web browser. Debian originally shipped Iceweasel version 17.0.10esr-1~deb7u1 in wheezy, but during a security-update version 24.3.0esr-1~deb7u1 was brought in through the wheezy-security channel. Because the selenium tests are used in an automated fashion in a quite large and long-running build pipeline we immediately rolled back to Iceweasel version 17.0.10esr-1~deb7u1 so everything can continue as expected. Of course we wanted to get the new Iceweasel version up and running, but we didn t want to break the existing workflow while working on it. This is where on-demand slave selection through labels comes in.
Basics: As soon as you re using Jenkins slaves you can instruct Jenkins to run a specific project on a particular (slave) node. By attaching labels to your slaves you can also use a label instead of a specific node name, providing more flexibility and scalability (to e.g. avoid problems if a specific node is down or you want to scale to more systems). Then Jenkins decides which of the nodes providing the according label should be considered for job execution. In the following screenshot a job uses the selenium label to restrict its execution to the slaves providing selenium and currently there are two nodes available providing this label:
TIP 1: Visiting $JENKINS_SERVER/label/$label/ provides a list of slaves that provide that given $label (as well as list of projects that use $label in their configuration), like:
TIP 2: Execute the following script on $JENKINS_SERVER/script to get a list of available labels of your Jenkins system:
Solution: In the according customer setup we re using the swarm plugin (with automated Debian deployment through Grml s netscript boot option, grml-debootstrap + Puppet) to automatically connect our Jenkins slaves to Jenkins master without any manual intervention. The swarm plugin allows you to define the labels through the -labels command line option.
By using the NodeLabel Parameter plugin we can configure additional parameters in Jenkins jobs: node and label . The label parameter allows us to execute the jobs on the nodes providing the requested label:
This is what we can use to gradually upgrade from the old Iceweasel version to the new one by keeping a given set of slaves at the old Iceweasel version while we re upgrading other nodes to the new Iceweasel version (same for the selenium-server version which we want to also control). We can include the version number of the Iceweasel and selenium-server packages inside the labels we announce through the swarm slaves, with something like:
if [ -r /etc/init.d/selenium-server ] ; then
  FLAGS="selenium"
  ICEWEASEL_VERSION="$(dpkg-query --show --showformat='$ Version ' iceweasel)"
  if [ -n "$ICEWEASEL_VERSION" ] ; then
    ICEWEASEL_FLAG="iceweasel-$ ICEWEASEL_VERSION%%.* "
    EXTRA_FLAGS="$EXTRA_FLAGS $ICEWEASEL_FLAG"
  fi
  SELENIUM_VERSION="$(dpkg-query --show --showformat='$ Version ' selenium-server)"
  if [ -n "$SELENIUM_VERSION" ] ; then
    SELENIUM_FLAG="selenium-$ SELENIUM_VERSION%-* "
    EXTRA_FLAGS="$EXTRA_FLAGS $SELENIUM_FLAG"
  fi
fi
Then by using -labels $FLAGS EXTRA_FLAGS in the swarm invocation script we end up with labels like selenium iceweasel-24 selenium-2.40.0 for the slaves providing the Iceweasel v24 and selenium v2.40.0 Debian packages and selenium iceweasel-17 selenium-2.40.0 for the slaves providing Iceweasel v17 and selenium v2.40.0.
This is perfect for our needs, because instead of using the selenium label (which is still there) we can configure the selenium jobs that should continue to work as usual to default to the slaves with the iceweasel-17 label now. The development related jobs though can use label iceweasel-24 and fail as often as needed without interrupting the build pipeline used for production.
To illustrate this here we have slave selenium-client2 providing Iceweasel v17 with selenium-server v2.40. When triggering the production selenium job it will get executed on selenium-client2, because that s the slave providing the requested labels:
Whereas the development selenium job can point to the slaves providing Iceweasel v24, so it will be executed on slave selenium-client1 here:
This setup allowed us to work on the selenium Ruby tests while not conflicting with any production build pipeline. By the time I m writing about this setup we ve already finished the migration to support Iceweasel v24 and the infrastructure is ready for further Iceweasel and selenium-server upgrades.
For the fifth year in a row the fearless WebKitGTK+ hackers have gathered in A Coru a to bring GNOME and the web closer. Igalia has organized and hosted it as usual, welcoming a record 30 people to its office. The GNOME foundation has sponsored my trip allowing me to fly the cool 18 seats propeller airplane from Lisbon to A Coru a, which is a nice adventure, and have pulpo a feira for dinner, which I simply love! That in addition to enjoying the company of so many great hackers.
Web with wider tabs and the new prefs dialog
The goals for the hackfest have been ambitious, as usual, but we made good headway on them. Web the browser (AKA Epiphany) has seen a ton of little improvements, with Carlos splitting the shell search provider to a separate binary, which allowed us to remove some hacks from the session management code from the browser. It also makes testing changes to Web more convenient again. Jon McCan has been pounding at Web s UI making it more sleek, with tabs that expand to make better use of available horizontal space in the tab bar, new dialogs for preferences, cookies and password handling. I have made my tiny contribution by making it not keep tabs that were created just for what turned out to be a download around. For this last day of hackfest I plan to also fix an issue with text encoding detection and help track down a hang that happens upon page load.
Martin Robinson and Dan Winship hack
Martin Robinson and myself have as usual dived into the more disgusting and wide-reaching maintainership tasks that we have lots of trouble pushing forward on our day-to-day lives. Porting our build system to CMake has been one of these long-term goals, not because we love CMake (we don t) or because we hate autotools (we do), but because it should make people s lives easier when adding new files to the build, and should also make our build less hacky and quicker it is sad to see how slow our build can be when compared to something like Chromium, and we think a big part of the problem lies on how complex and dumb autotools and make can be. We have picked up a few of our old branches, brought them up-to-date and landed, which now lets us build the main WebKit2GTK+ library through cmake in trunk. This is an important first step, but there s plenty to do.
Hackers take advantage of the icecream network for faster builds
Under the hood, Dan Winship has been pushing HTTP2 support for libsoup forward, with a dead-tree version of the spec by his side. He is refactoring libsoup internals to accomodate the new code paths. Still on the HTTP front, I have been updating soup s MIME type sniffing support to match the newest living specification, which includes specification for several new types and a new security feature introduced by Internet Explorer and later adopted by other browsers. The huge task of preparing the ground for a one process per tab (or other kinds of process separation, this will still be topic for discussion for a while) has been pushed forward by several hackers, with Carlos Garcia and Andy Wingo leading the charge.
Jon and Guillaume battling code
Other than that I have been putting in some more work on improving the integration of the new Web Inspector with WebKitGTK+. Carlos has reviewed the patch to allow attaching the inspector to the right side of the window, but we have decided to split it in two, one providing the functionality and one the API that will allow browsers to customize how that is done. There s a lot of work to be done here, I plan to land at least this first patch durign the hackfest. I have also fought one more battle in the never-ending User-Agent sniffing war, in which we cannot win, it looks like.
Hackers chillin at A Coru a
I am very happy to be here for the fifth year in a row, and I hope we will be meeting here for many more years to come! Thanks a lot to Igalia for sponsoring and hosting the hackfest, and to the GNOME foundation for making it possible for me to attend! See you in 2014!
It s a somewhat strange feeling to spend time fixing things that broke
instead of implementing new things, but it s not like I m a creative
guy anyway
buildd.debian.orgwent down,
but
it s now up again
thanks to the relevant admins. The
CGI part mentioned by Philipp
was fun to debug: the CGI worked when called from a shell, but not
from Apache (with an apparently strange DNS resolution error). I
suggested attaching it with strace, and the result was even
stranger: a connection to nscd s socket was attempted but the DNS
resolution through the network wasn t. A closer look revealed the
nsswitch.conf file was read, and its configuration was OK, so
what? Looking at libnss_dns.so.2, one could see the usual
syscalls for library loading: open, read, fstat, mmap oh
wait, mmap failed with ENOMEM (Cannot allocate memory). Tollef
bumped the rlimits on the Apache side,
and that was it.
Linux kernel ABI bump notifications: they were
acting weird
since kernel people resumed uploading -trunk- kernels to
experimental. That was identified a while ago, but since I like
tested bugfixes,
I actually did wait for it to happen; fixed in
r68876.
Of course, d-i s git repository
was updated
to bump the ABI from 3.10-2-* to 3.10-3-* accordingly.
#722939 was reported against
udev-udeb since depending on a deb library isn t a good thing
when you re an udeb binary.
Trying to look into d-i build failures earlier this month,
I thought I managed to reproduce the issue,
but that was just my misunderstanding the way apt works. Long story
short, *InRelease and *Packages files are checked before
they re put under lists/; modifying the contents isn t expected:
the modification time is used to set the If-Modified-Since header
when trying to fetch a new version from the server, and it s OK to
get a 304 Not Modified in that case. As a side effect, that means
the files can be hand-edited, for example because you need to work
around the dependency bug mentioned above, and one will still get
Hit lines for all those files. If something goes wrong, one can
still rm the files and start over, but that looks like a large
hammer. Let s see if the issue can get reproduced (and debugged!)
later on.
For those last two points, the long term plan is:
To check udeb installability automatically to catch such dependency
issues as early as possible.
To keep many more logs, so that one can still read the whole output
a few weeks after the fact, and so that one can compare some logs
to try and spot difference in a semi-automated fashion.
Hopefully getting this done this week (famous last words, eh?).
Here it goes. I was looking for an LCD display for my microservers 5,25'' bay and found this neat post. The manufacturer of the LCD display used there provides different displays for this purpose. I've decided for an U204FR-A2 in black with a red backlight. It left Hongkong around five days later and arrived here another 6 days later. All in all: I got it after 11 days. I unpacked the LCD device. It comes with an internal USB connector and is driven by an Hitachi HD44780 LCD controller. The connection wasn't a problem at all. I've already put a Silverstone SST-EC04-P PCIe card with two USB 3.0 external ports and an internal 19pin dual port connector into the systems PCIe 1x slot. Now to connect the LCD with this card I've bought an Inline 19pin USB 3.0 header to 8pin double USB 2.0 header adapter and connected the card with the LCD display. Easy, right?
To make the display "attached" to the case - it comes with two steel sheets and two screw holes each, that cannot be attached to anything in the microserver case - I've used a small workaround: double-faced adhesive tape and two halfs of a matchbox - one can also use small scantlings - and created a bonding between the steel sheets and the case.
That's it. I put the cover plate carefully back - the steels sheets of the LCD display and the LED of the server will bump to each other!
There are two programs to output information to the LCD display. These are lcdproc and lcd4linux. I started with the first one which only provides pre-defined screens. Seems with the latter one can create own screens. This is an option for the future. lcdproc consists of two programs. First there is a daemon called LCDd. It controls the driver, contrast etc.pp. The relevant parts of its configuration file /etc/LCDd.conf look like as shown below. Note that I did not change the default values for contrast or brightness.
[server]
Driver=hd44780
WaitTime=25

[hd44780]
ConnectionType=lcd2usb
Size=20x4
To print something to the screen one can use the lcdproc command, which is configured via /etc/lcdproc.conf. I've enabled the Iface, TimeDate, SMP-CPU, and MiniClock screens. The program is started during startup via cron. The file /etc/cron.d/lcdproc simply contains this:
@reboot root lcdproc
The following pictures show the resulting screens, which change every 25 seconds. That's it.
 I've installed 1 kilowatt of solar panels on my roof, using professional
grade eqipment. The four panels are Astronergy 260 watt panels, and they're
mounted on IronRidge XR100 rails. Did it all myself, without help.
I've installed 1 kilowatt of solar panels on my roof, using professional
grade eqipment. The four panels are Astronergy 260 watt panels, and they're
mounted on IronRidge XR100 rails. Did it all myself, without help.
 I had three goals for this install:
 The last gotcha, which I luckily anticipated, is that panels will slide
down off the rails before you can get them bolted down. This is where a
second pair of hands would have been most useful. But, I macguyvered a
solution, attaching temporary clamps before bringing a panel up, that
stopped it sliding down while I was attaching it.
The last gotcha, which I luckily anticipated, is that panels will slide
down off the rails before you can get them bolted down. This is where a
second pair of hands would have been most useful. But, I macguyvered a
solution, attaching temporary clamps before bringing a panel up, that
stopped it sliding down while I was attaching it.
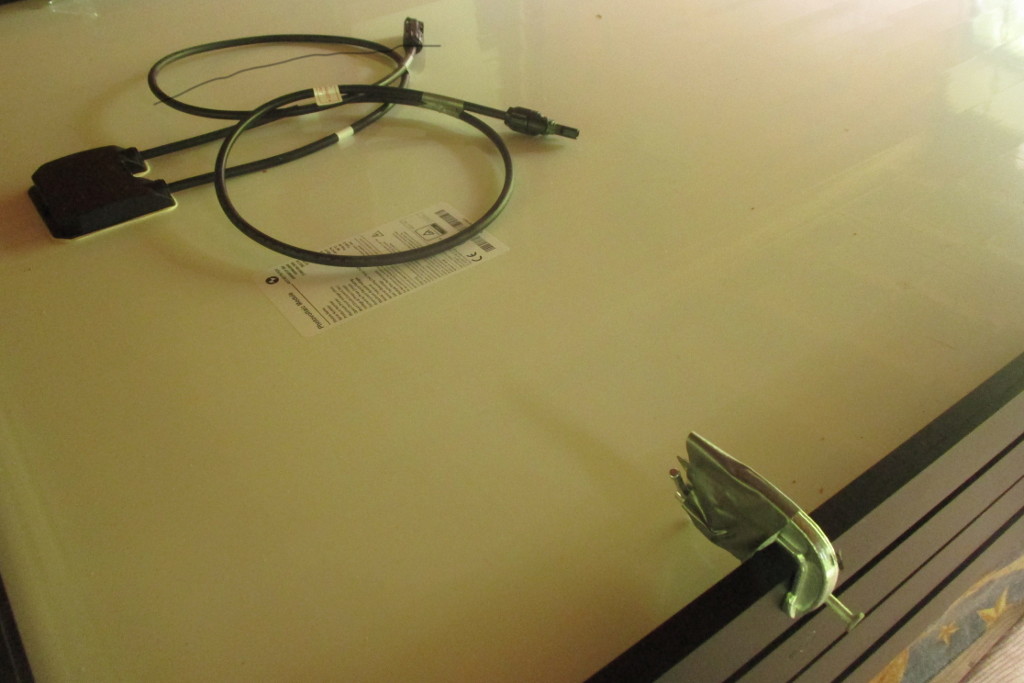 I also finished the outside wiring today. Including the one hack of this
install so far. Since the local hardware store didn't have a suitable
conduit to bring the cables off the roof, I cobbled one together from pipe,
with foam inserts to prevent chafing.
I also finished the outside wiring today. Including the one hack of this
install so far. Since the local hardware store didn't have a suitable
conduit to bring the cables off the roof, I cobbled one together from pipe,
with foam inserts to prevent chafing.
 While I have 1 kilowatt of power on my roof now, I won't be able to use it
until next week. After ordering the upgrade, I realized that my old PWM
charge controller would be able to handle less than half the power, and to
get even that I would have needed to mount the fuse box near the top of the
roof and run down a large and expensive low-voltage high-amperage cable,
around OO AWG size. Instead, I'll be upgrading to a MPPT controller, and
running a single 150 volt cable to it.
Then, since the MPPT controller can only handle 1 kilowatt when it's
converting to 24 volts, not 12 volts, I'm gonna have to convert the
entire house over from 12V DC to 24V DC, including changing all the light
fixtures and rewiring the battery bank...
While I have 1 kilowatt of power on my roof now, I won't be able to use it
until next week. After ordering the upgrade, I realized that my old PWM
charge controller would be able to handle less than half the power, and to
get even that I would have needed to mount the fuse box near the top of the
roof and run down a large and expensive low-voltage high-amperage cable,
around OO AWG size. Instead, I'll be upgrading to a MPPT controller, and
running a single 150 volt cable to it.
Then, since the MPPT controller can only handle 1 kilowatt when it's
converting to 24 volts, not 12 volts, I'm gonna have to convert the
entire house over from 12V DC to 24V DC, including changing all the light
fixtures and rewiring the battery bank...


 After the workshop on Saturday, members of the OSCAL team successfully reconstructed the SDR and antenna at the Debian info booth on Sunday and a wide range of shortwave and ham signals were detected:
 Here is a close-up look at the laptop, RTL-SDR dongle (above laptop), Ham-It-Up converter (above water bottle) and MFJ-971 ATU (on right):
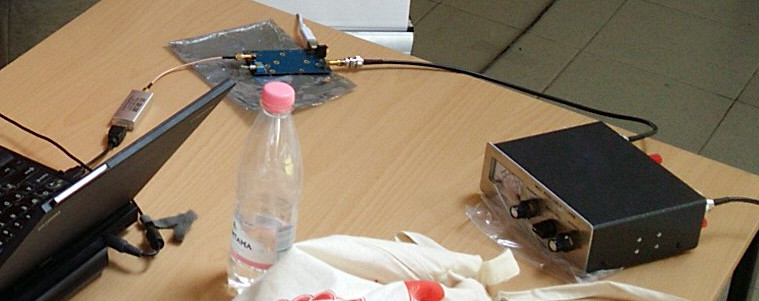 Buying the parts
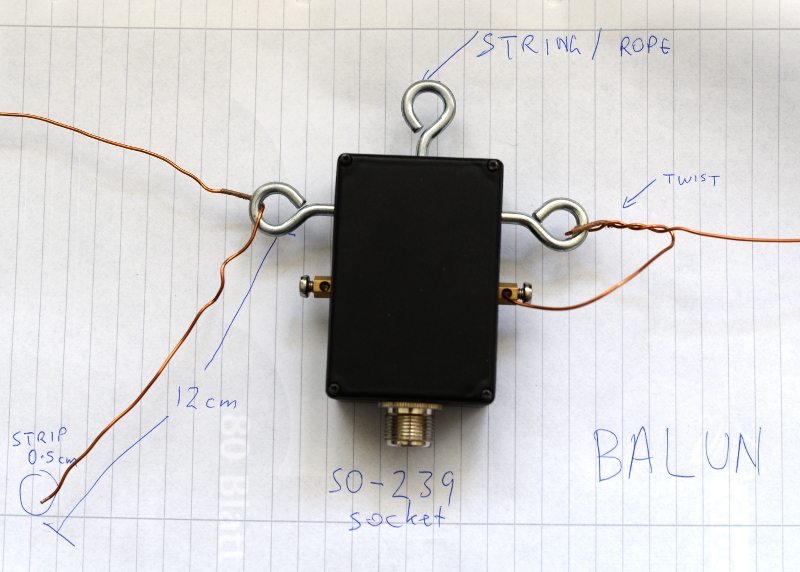 Configuring gqrx for the up-converter and shortwave signals
Inspect the up-converter carefully. Look for the crystal and find the frequency written on the side of it. The frequency written on the specification sheet or web site may be wrong so looking at the crystal itself is the best way to be certain. On my Ham It Up, I found a crystal with 125.000 written on it, this is 125 MHz.
Configuring gqrx for the up-converter and shortwave signals
Inspect the up-converter carefully. Look for the crystal and find the frequency written on the side of it. The frequency written on the specification sheet or web site may be wrong so looking at the crystal itself is the best way to be certain. On my Ham It Up, I found a crystal with 125.000 written on it, this is 125 MHz.
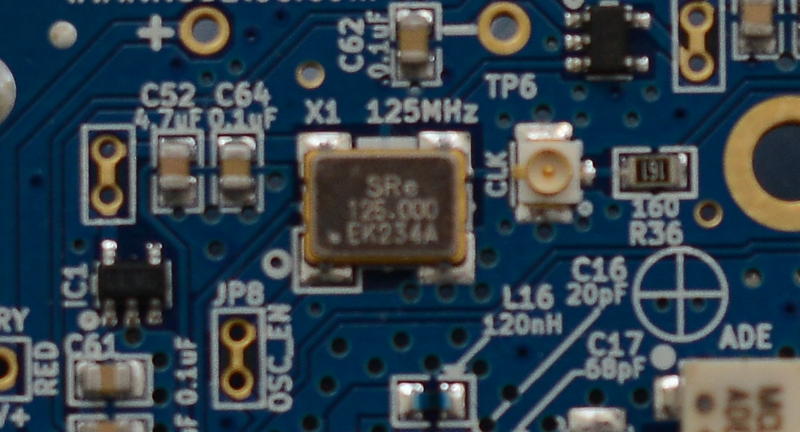 Launch gqrx, go to the File menu and select I/O devices. Change the LNB LO value to match the crystal frequency on the up-converter, with a minus sign. For my Ham It Up, I use the LNB LO value -125.000000 MHz.
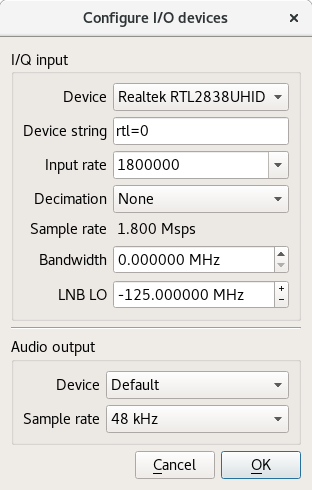 Click OK to close the I/O devices window.
On the Input Controls tab, make sure Hardware AGC is enabled.
On the Receiver options tab, change the Mode value. Commercial shortwave broadcasts use AM and amateur transmission use single sideband: by convention, LSB is used for signals below 10MHz and USB is used for signals above 10MHz. To start exploring the 20 meter amateur band around 14.2 MHz, for example, use USB.
Click OK to close the I/O devices window.
On the Input Controls tab, make sure Hardware AGC is enabled.
On the Receiver options tab, change the Mode value. Commercial shortwave broadcasts use AM and amateur transmission use single sideband: by convention, LSB is used for signals below 10MHz and USB is used for signals above 10MHz. To start exploring the 20 meter amateur band around 14.2 MHz, for example, use USB.
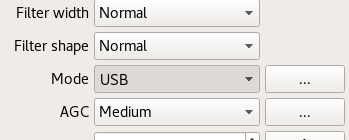 In the top of the window, enter the frequency, for example, 14.200 000 MHz.
Now choose the FFT Settings tab and adjust the Freq zoom slider. Zoom until the width of the display is about 100 kHZ, for example, from 14.15 on the left to 14.25 on the right.
In the top of the window, enter the frequency, for example, 14.200 000 MHz.
Now choose the FFT Settings tab and adjust the Freq zoom slider. Zoom until the width of the display is about 100 kHZ, for example, from 14.15 on the left to 14.25 on the right.
 Click the Play icon at the top left to start receiving. You may hear white noise. If you hear nothing, check the computer's volume controls, move the Gain slider (bottom right) to the maximum position and then lower the Squelch value on the Receiver options tab until you hear the white noise or a transmission.
Adjust the Antenna Tuner knobs
Now that gqrx is running, it is time to adjust the knobs on the antenna tuner (ATU). Reception improves dramatically when it is tuned correctly. Exact instructions depend on the type of ATU you have purchased, here I present instructions for the MFJ-971 that I have been using.
Click the Play icon at the top left to start receiving. You may hear white noise. If you hear nothing, check the computer's volume controls, move the Gain slider (bottom right) to the maximum position and then lower the Squelch value on the Receiver options tab until you hear the white noise or a transmission.
Adjust the Antenna Tuner knobs
Now that gqrx is running, it is time to adjust the knobs on the antenna tuner (ATU). Reception improves dramatically when it is tuned correctly. Exact instructions depend on the type of ATU you have purchased, here I present instructions for the MFJ-971 that I have been using.
 Turn the TRANSMITTER and ANTENNA knobs to the 12 o'clock position and leave them like that. Turn the INDUCTANCE knob while looking at the signals in the gqrx window. When you find the best position, the signal strength displayed on the screen will appear to increase (the animated white line should appear to move upwards and maybe some peaks will appear in the line).
When you feel you have found the best position for the INDUCTANCE knob, leave it in that position and begin turning the ANTENNA knob clockwise looking for any increase in signal strength on the chart. When you feel that is correct, begin turning the TRANSMITTER knob.
Listening to a transmission
At this point, if you are lucky, some transmissions may be visible on the gqrx screen. They will appear as darker colours in the waterfall chart. Try clicking on one of them, the vertical red line will jump to that position. For a USB transmission, try to place the vertical red line at the left hand side of the signal. Try dragging the vertical red line or changing the frequency value at the top of the screen by 100 Hz at a time until the station is tuned as well as possible.
Try and listen to the transmission and identify the station. Commercial shortwave broadcasts will usually identify themselves from time to time. Amateur transmissions will usually include a callsign spoken in the
Turn the TRANSMITTER and ANTENNA knobs to the 12 o'clock position and leave them like that. Turn the INDUCTANCE knob while looking at the signals in the gqrx window. When you find the best position, the signal strength displayed on the screen will appear to increase (the animated white line should appear to move upwards and maybe some peaks will appear in the line).
When you feel you have found the best position for the INDUCTANCE knob, leave it in that position and begin turning the ANTENNA knob clockwise looking for any increase in signal strength on the chart. When you feel that is correct, begin turning the TRANSMITTER knob.
Listening to a transmission
At this point, if you are lucky, some transmissions may be visible on the gqrx screen. They will appear as darker colours in the waterfall chart. Try clicking on one of them, the vertical red line will jump to that position. For a USB transmission, try to place the vertical red line at the left hand side of the signal. Try dragging the vertical red line or changing the frequency value at the top of the screen by 100 Hz at a time until the station is tuned as well as possible.
Try and listen to the transmission and identify the station. Commercial shortwave broadcasts will usually identify themselves from time to time. Amateur transmissions will usually include a callsign spoken in the  It's been a long time I did not write any new blog posts, and finally I got
something which is interesting enough for a new post and so here it is.
I actually wanted some bills from my ISP for some work and I could not find mail
from the ISP which had bills for some specific months in my mailbox. Problem
with my ISP is bills are accessible in their account which can be only accessed
from their own network. They do have a mobile app and that does not seem to work
especially for the billing section. I used mobile app and selected month for
which I did not have bill and clicked Send Mail button. App happily showed
message saying it sent the bill to my registered mail address but that was a
fancy lie. After trying several time I gave up and decided I will do it once I
get back home.
Fast forward few hours, I'm back home from office and then I sat in front of my
laptop and connected to ISP site, promptly downloaded the bills, then used
notmuch-emacs and fire up a mail composer, attach those HTML file (yeah they
produce bill in HTML file :-/) send it to my gmail and forget about it.
Fast forward few more days, I just remember I need those bills. I got hold of
mail I sent earlier in gmail inbox and clicked on attachment and when browser
opened the attachment I was shocked/surprised . Did you ask why?. See what I saw
when I opened attachment.
It's been a long time I did not write any new blog posts, and finally I got
something which is interesting enough for a new post and so here it is.
I actually wanted some bills from my ISP for some work and I could not find mail
from the ISP which had bills for some specific months in my mailbox. Problem
with my ISP is bills are accessible in their account which can be only accessed
from their own network. They do have a mobile app and that does not seem to work
especially for the billing section. I used mobile app and selected month for
which I did not have bill and clicked Send Mail button. App happily showed
message saying it sent the bill to my registered mail address but that was a
fancy lie. After trying several time I gave up and decided I will do it once I
get back home.
Fast forward few hours, I'm back home from office and then I sat in front of my
laptop and connected to ISP site, promptly downloaded the bills, then used
notmuch-emacs and fire up a mail composer, attach those HTML file (yeah they
produce bill in HTML file :-/) send it to my gmail and forget about it.
Fast forward few more days, I just remember I need those bills. I got hold of
mail I sent earlier in gmail inbox and clicked on attachment and when browser
opened the attachment I was shocked/surprised . Did you ask why?. See what I saw
when I opened attachment.
 Well I was confused for moment on what happened, I tried downloading the file
and opened it an editor, and I see Chinese characters here also. After reaching
home I checked the Sent folder in my laptop where I keep copy of mails sent
using notmuch-emacs's notmuch-fcc-dirs variable. I open the file and open
the attachement and I see same character as I saw in browser!. I open the
original bills I downloaded and it looks fine. To check if I really attached the
correct files I again drafted a mail this time to my personal email and sent it.
Now I open the file from Sent folder and voila again there is different content
inside my attachment!. Same happens when I receive the mail and open the
attachment everything inside is Chinese characters!. Totally lost I finally
opened the original file using emacs, since I use spacemacs it asked me for
downloading of html layer and after which I was surprised because everything
inside the editor is in Chinese!. OK finally I've something now so I opened same
file at same time in nano from terminal and there it looks fine!. OK that is
weird again I read carefully content and saw this line in beginning of file
Well I was confused for moment on what happened, I tried downloading the file
and opened it an editor, and I see Chinese characters here also. After reaching
home I checked the Sent folder in my laptop where I keep copy of mails sent
using notmuch-emacs's notmuch-fcc-dirs variable. I open the file and open
the attachement and I see same character as I saw in browser!. I open the
original bills I downloaded and it looks fine. To check if I really attached the
correct files I again drafted a mail this time to my personal email and sent it.
Now I open the file from Sent folder and voila again there is different content
inside my attachment!. Same happens when I receive the mail and open the
attachment everything inside is Chinese characters!. Totally lost I finally
opened the original file using emacs, since I use spacemacs it asked me for
downloading of html layer and after which I was surprised because everything
inside the editor is in Chinese!. OK finally I've something now so I opened same
file at same time in nano from terminal and there it looks fine!. OK that is
weird again I read carefully content and saw this line in beginning of file
 I made following observation from above experiments.
 Back in 2010 when I needed an ADSL2 router in the US I bought a
  The recent
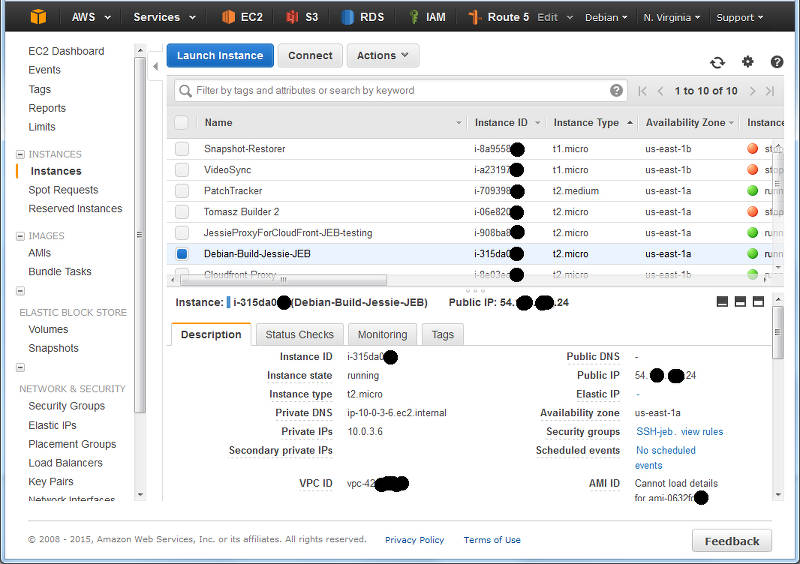
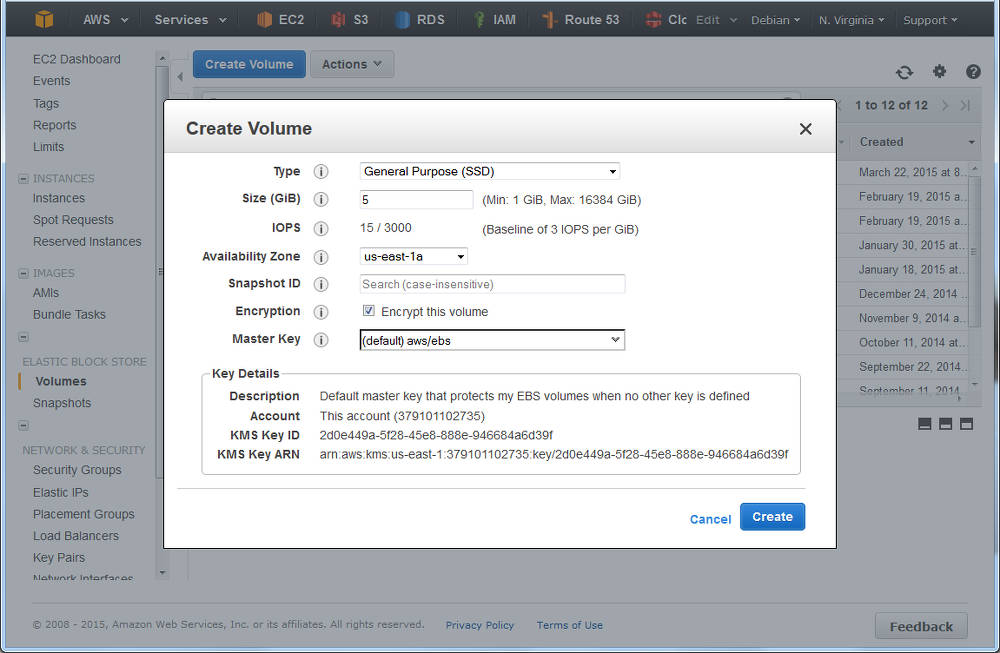
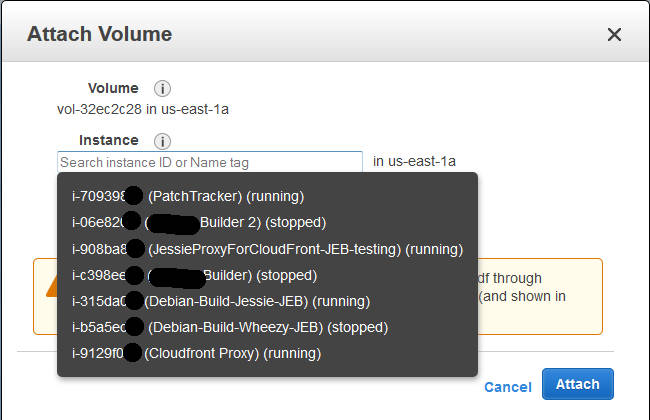

 I've had some 8GB USB keys made, with the Debian swirl and text. By
buying a reasonable number, I've got what I think is a good price for
nice high-quality keys (metal body with a solid loop for attaching to
a keyring). I'm now selling these for 7 pounds each, and I'm planning
on bringing some to DebConf 15 too, where they'll be 10 EUR.
I've had some 8GB USB keys made, with the Debian swirl and text. By
buying a reasonable number, I've got what I think is a good price for
nice high-quality keys (metal body with a solid loop for attaching to
a keyring). I'm now selling these for 7 pounds each, and I'm planning
on bringing some to DebConf 15 too, where they'll be 10 EUR.
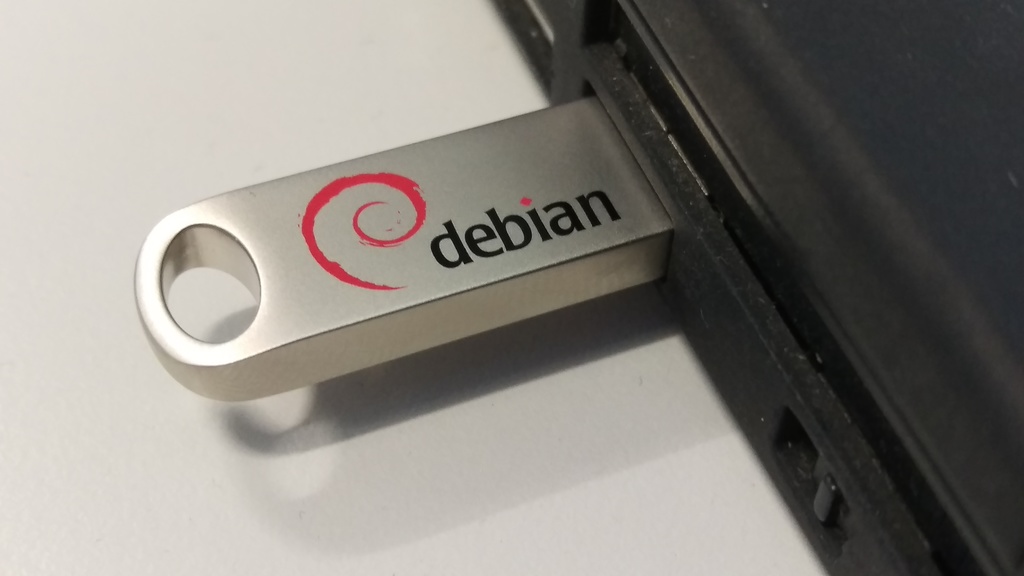

 The random gaps (
 With a
  (continuation of
 As it is nearly time to release Debian 8 (codename jessie), I've
uploaded a new version of the Linux kernel to unstable which I
hope will be the version to go into the initial release (8.0).
The changes from the current version in testing are mostly bug
fixes:
As it is nearly time to release Debian 8 (codename jessie), I've
uploaded a new version of the Linux kernel to unstable which I
hope will be the version to go into the initial release (8.0).
The changes from the current version in testing are mostly bug
fixes:
 About a month ago, on 20th of March,
  Problem description: One of my customers had a problem with their
 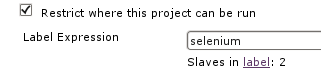 TIP 1: Visiting $JENKINS_SERVER/label/$label/ provides a list of slaves that provide that given $label (as well as list of projects that use $label in their configuration), like:
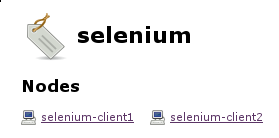
 This is what we can use to gradually upgrade from the old Iceweasel version to the new one by keeping a given set of slaves at the old Iceweasel version while we re upgrading other nodes to the new Iceweasel version (same for the selenium-server version which we want to also control). We can include the version number of the Iceweasel and selenium-server packages inside the labels we announce through the swarm slaves, with something like:
 Whereas the development selenium job can point to the slaves providing Iceweasel v24, so it will be executed on slave selenium-client1 here:
 This setup allowed us to work on the selenium Ruby tests while not conflicting with any production build pipeline. By the time I m writing about this setup we ve already finished the migration to support Iceweasel v24 and the infrastructure is ready for further Iceweasel and selenium-server upgrades.
 For the fifth year in a row the fearless WebKitGTK+ hackers have gathered in A Coru a to bring GNOME and the web closer. Igalia has organized and hosted it as usual, welcoming a record 30 people to its office. The GNOME foundation has sponsored my trip allowing me to fly the cool 18 seats propeller airplane from Lisbon to A Coru a, which is a nice adventure, and have pulpo a feira for dinner, which I simply love! That in addition to enjoying the company of so many great hackers.
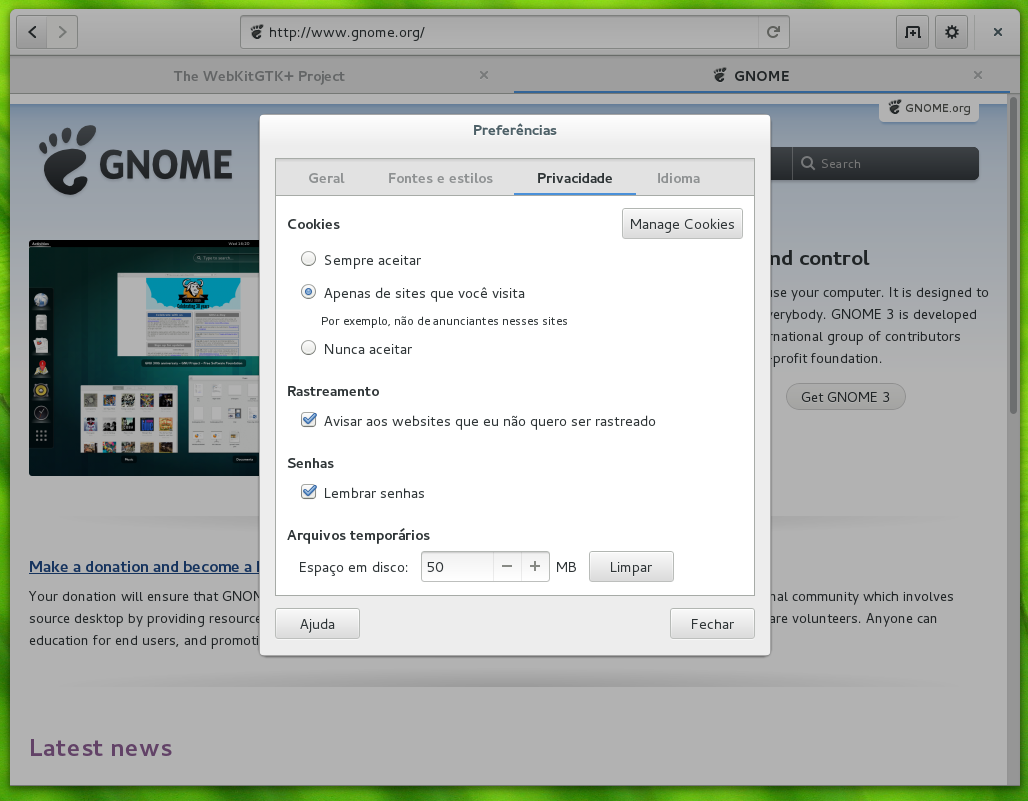

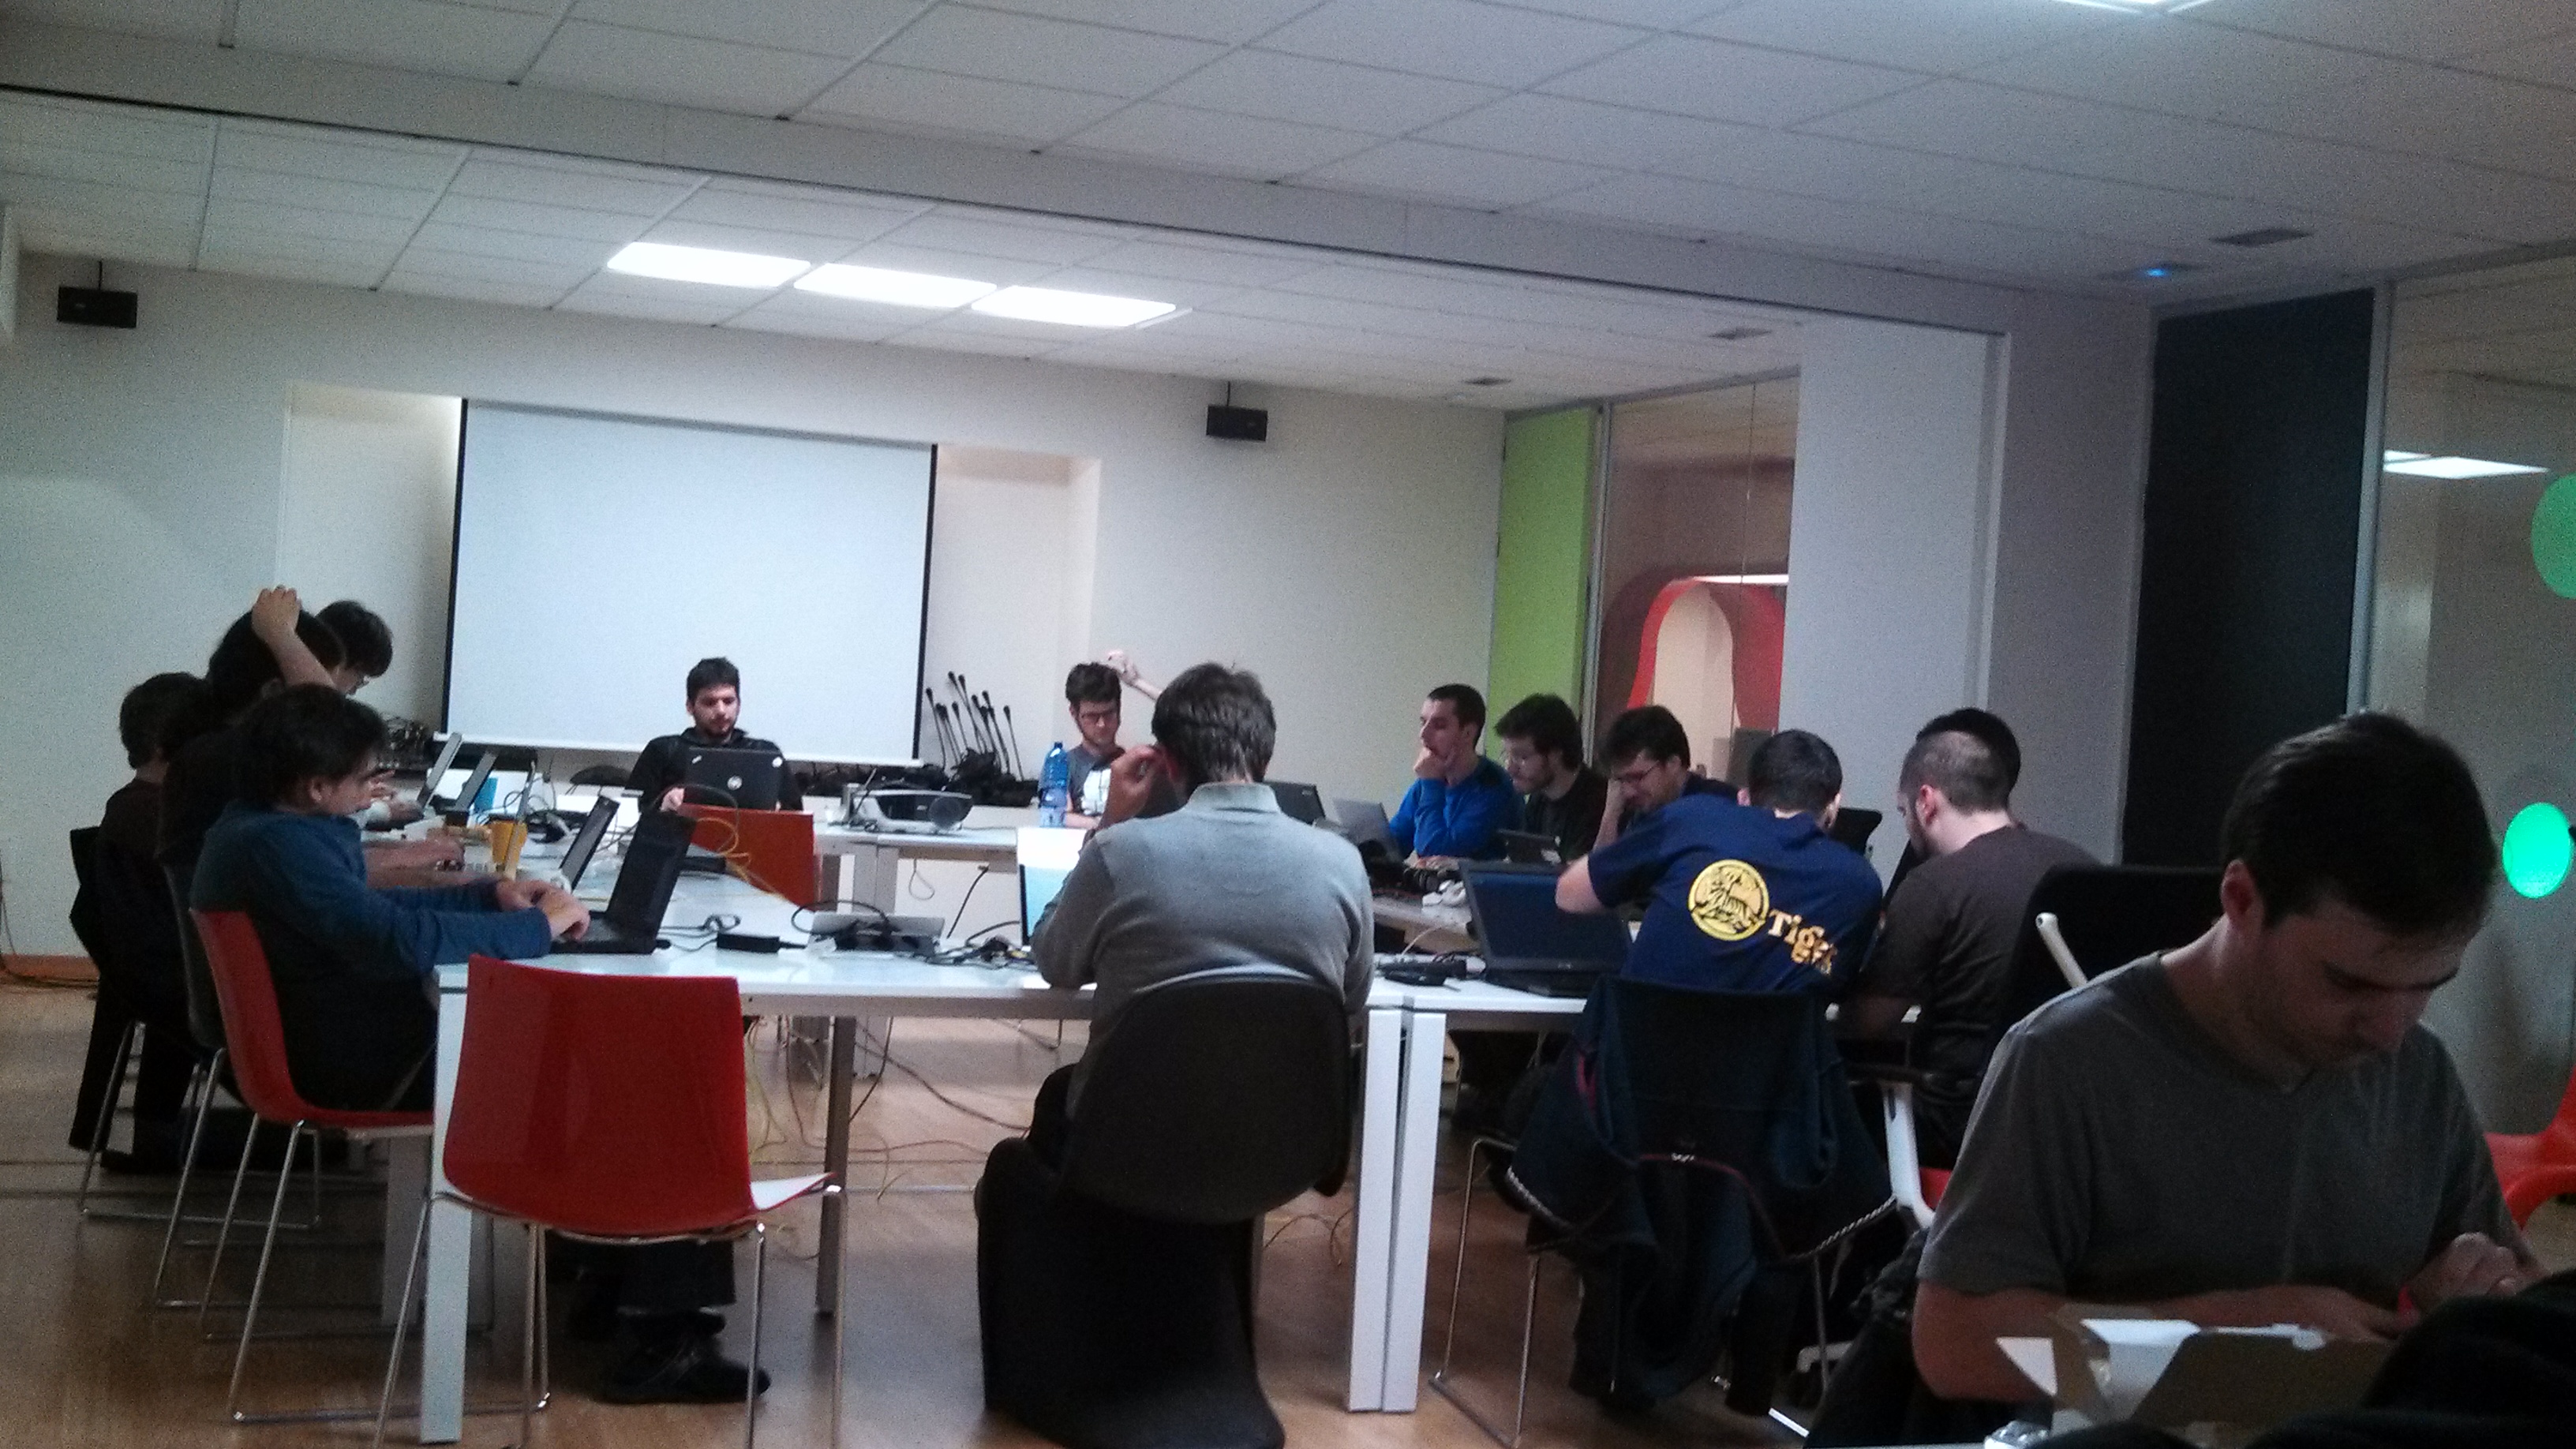


